


9. Crimp or clamp on a heavy-duty, battery-connection terminal to the other
end of the negative (–) and positive (+) cable. Connect the negative (–) bat-
tery terminal cable to the negative (–) battery terminal connector.
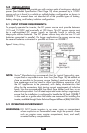
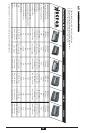
10. Ensure the inverter power switch is in the off position (see FIGURE 1).
11.
Connect the ring terminal end of the negative (–) cable into the black stud marked
(–) on the inverter back panel and tighten the retaining nut.
12. Connect the battery connector to the negative (–) battery terminal.
13. Connect the ring terminal end of the positive (+) cable into the red stud
marked (+) on the inverter’s back panel (see FIGURE 2) and tighten the
retaining nut.
14. Connect the other end of the (+) positive cable to one terminal of the
heavy-duty fuse holder.
15. Connect the other conductor of the heavy-duty fuse holder to the positive (+)
battery terminal.
16. Connect an insulated wire (at least #12 AWG) between the chassis ground-
ing screw on the inverter’s case and a solid electrical ground to minimize
possible electrical noise generation in TVs and radios.
Do NOT connect this wire to the negative DC input terminal.
17. Ensure that all electrical connections are tight.
18. Ensure that the inverter’s on/of switch is OFF.
19. Insert the fuse into the fuse holder. (There may be some sparking.)
20. Turn “on” the inverter and apply a test load to the AC outlets.
21. Ensure the battery has an adequate charge. If voltage is low, the cables may
be too long or the gauge too light.
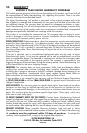
22. If steps 17 and 21 do not correct the problem, contact Vector Technical
Support Department toll-free (866) 584-5504, for professional direction.
17