


THIS COMBINATION SMOKE/CO ALARM WILL NOT WORK WITHOUT A GOOD
BATTERY PROPERLY INSTALLED. THE ALARM SHOULD BE TESTED WHEN
INSTALLED AND THEN TESTED WEEKLY AFTER THAT.
INSTALLATION AND OPERATION
INSTALLATION INSTRUCTIONS: CAUTION!! READ CAREFULLY.
CAUTION: THIS UNIT IS SEALED. THE COVER IS NOT REMOVABLE!
• This combination smoke/CO alarm requires a working 9 Volt battery to operate properly. This
combination smoke/CO alarm WILL NOT work if the battery is removed, drained or improperly
connected. DO NOT use any other kind of battery except as specified in this manual.
NOTE: AC/DC combination alarms offer added protection in the event of a power failure or a
drained battery.
• Test alarm immediately following installation and weekly for proper operation by pushing the
test button. The alarm will then test itself for proper operation. The alarm then resumes normal
operation.
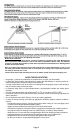
• A mounting plate is provided on the back of the alarm.
• Remove the mounting plate from the back of the alarm by holding the mounting plate and twisting
the alarm in the direction indicated by the "TURN TO REMOVE" arrow on the side of the alarm
base.
TAMPER LOCKING PIN: To make your alarm somewhat tamper resistant, a locking pin has been
provided (break-away part of mounting plate). Using this tamper pin will deter children and others
from removing the alarm from the mounting plate. To use the tamper pin, insert it into the hole in the
side of the alarm after the alarm has been installed on the mounting plate. Using long nose pliers,
pull the tamper pin out of the hole. It is now possible to remove the alarm from the mounting plate.
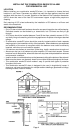
The combination smoke/CO alarm is designed for easy mounting on wall or ceiling. A complete
mounting kit is included with the alarm. First, attach the mounting bracket on the wall or ceiling with
the screws and anchors provided. Second, push and turn the alarm clockwise on the mounting
bracket. (Note: Your smoke alarm is equipped with a safety device which prevents mounting unless
a battery is installed. If alarm will not lock into the mounting bracket, check to make sure a battery is
installed.)
1. To activate 9 volt battery and alarm, hold the QUICK DRAW
TM
pull-out battery drawer closed,
pull and remove the PULL-TAB. Discard PULL-TAB.
NOTE: After initial battery power up, the Green LED will flash on rapidly approximately 20 times
and then remain off. Proceed to test the alarm.
2. See "TAMPER LOCKING PIN."
3. Press the TEST/SILENCE button. Check the LED's for proper operation (see "TESTING
YOUR ALARM"). After test sequence, the Green LED flashes on approximately every 40
seconds to indicate proper operation.
OPERATION, TESTING & MAINTENANCE
OPERATION: The alarm is operating once the power is connected (the battery must be installed).
SMOKE/COMBUSTION PRODUCTS ALARM CONDITION: When products of combustion are
sensed, the unit sounds a loud SMOKE alarm pattern which continues until the air is cleared. For
the SMOKE alarm pattern, this alarm incorporates the internationally recognized horn signal for
evacuation. During smoke alarm mode, the horn produces three beeps followed by a two second
pause and then repeats. The Red LED will flash
on simultaneously with the horn pulses.
CARBON MONOXIDE ALARM CONDITION: When CO is sensed at a high level or at a low level
for a lengthy period of time, the unit sounds a loud CO alarm pattern (4 short horn pulse, pause,
repeat) for 4 minutes then 1 minute of silence. This alarm pattern continues until the air is cleared
or the alarm is reset. The Red LED will flash
on simultaneously with the horn pulses.
TESTING YOUR ALARM: Test alarm weekly for proper operation by pushing, then releasing, the
TEST/SILENCE button. The alarm will then test itself for proper operation of BOTH the SMOKE and
CO detection and alarm circuits. The Red LED will begin to flash rapidly and the alarm will indicate
two cycles of the SMOKE alarm pattern. The Red LED will simultaneously flash during the SMOKE
alarm pattern. This will be followed by two cycles of the CO alarm pattern, during which the Red
LED flashes on simultaneously with the horn pulses.
Page 6