


Page -5-
SERVICING
A hazardous condition may result if a heater is used that has
been modified or is not functiong properly. When the heater is
working properly:
*The flame is contained within the heater.
*The flame is essentially blue with perhaps some
yellow tipping.
*There is no strong disagreeable odor, eye burning or
other physical discomfort.
*There is no smoke or soot internal or external to the
heater.
*There are no unplanned or unexplained shut downs of
the heater.
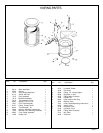
The parts list show the heater as it was constructed. Do not use
a heater which is different from that shown. For this heater, the
regulator must be set to supply 4" water column (W.C.) outlet
pressure. If there is any uncertainty about the regulator setting,
havie checked.
A heater which is not working right must be repaired, but only by
a trained, experienced service person. To find the service center
closest to you, visit our webside at www.scheuco.com or call
(888) 619-7060.
You may also obtain in-warranty or out-of-warranty service by
taking the product to your local service center.
In-warranty products will be repaired with no charge for either
parts or labor. Please include a breif statement indicating date,
place of purchase, the nature of the problem and proof of
purchase.
Out-of-warranty products will be repaired with a charge for parts
and labor.
OPERATING INSTRUCTIONS
PREPARING FOR OPERATION
1.Check the heater for possible shipping damage. If any is
found, immediately notify your dealer.
2.Follow all of the "Safety Precautions".
3.Install plumbing to a low pressure (1/2 psig Maximum)
source of natural gas, using a minimum 3/4" ID hose or
flexible connector not over 10 feet in length.
4.Connect the hose to the heater at the 1/2" SAE flare fitting at
the inlet.
5.Securely tighten all gas connections.
6.Open the gas cock and leak check all gas connections with a
solution of soap and water. DO NOT USE A FLAME.
START
1.Fully open the gas cock at the natural gas source.
2.Place control knob of the safety pilot valve in pilot position
and depress the knob admitting gas to pilot. Push and
release piezo button until the pilot lights, multiple tries may
be necessary. Alternately place a lighted match near the
(pilot is above the valve sheild). If hose is filled with
air, allow a few minutes for gas to reach the pilot.
3.When pilot lights, continue to hold the button on the safety
pilot valve depressed for 30 seconds, then release.
4.If the pilot goes out, wait 5 minutes and repeat the start
procedures.
5.When the pilot remains lit, turn the knob left 1/4 turn to the
"ON" position and the main burner will light.
CAUTION; INADEQUATE FUEL SUPPLY or lowering burn
rate can cause sooting.
STOP
1.Securely close the gas cock at the gas source.
2.Depress the control knob of the pilot valve and turn clockwise
to "OFF" position.
RESTART AFTER SAFETY SHUTDOWN
1.Securely close gas cock at the gas source.
2.Wait 5 minutes.
3.Restart following "Start" procedures.
MODEL
100-RANG