


5
Unpacking and preparing your stove for installation.
1. Remove your stove from the outer packaging and place on oor. Please inspect stove and check
that it is not damaged in any way. Never attempt to use a stove that has been damaged.
2. If you are installing the stove yourself, proceed as follows. However, if you are unsure about any
aspect of stove installation, please contact your dealer and he will discuss installation with you or
put you in touch with an experienced stove installer.
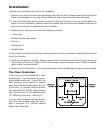
3. Open re door. Remove and check the following contents.
• 4 stove legs
• Wooden handle and screws
• Ash pan
• Operating tool
• Handle holder
In the unlikely event that something is missing please contact your dealer immediately and we will
rectify the situation.
4. Gently lay the stove on its back. Remove screws from 4 corners of base and t one of the legs to
each corner of the stove. Tighten bolt to ensure leg is secure to base of stove. When complete,
gently stand the stove upright.
5. Move the stove into position. Do not drag the stove as this may damage the legs, screws or base.
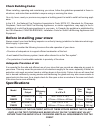
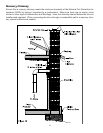
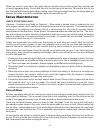
Installation
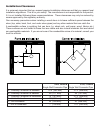
If the stove is to be installed on a com-
bustible oor, it must be placed on a non-
combustible hearth pad. In the USA, the
oor protector must extend 8” beyond
each side of the ue loading door and 16”
to the front. In Canada, the oor protec-
tor must extend 8“ (200mm) beyond each
side and the back of the appliance and
18“ (450mm) to the front. (See g. 4)
In a rear vent installation the oor protec-
tion must also extend under the stove-
pipe a minimum of 2” (50mm) beyond
either side of the pipe.
The Floor Protection