Part number 550-100-026/0404
GAS-FIRED WATER BOILER SERIES 2 — Boiler Manual
2
THE BOILER, WITH
PhPh
PhPh
Ph
DD
DD
D
TECHNOLOGY – HOW IT WORKS . . .
PhDPhD
PhDPhD
PhD technology
PhD Technology, Precision hydronic Data, is an intelligent system that
delivers Precision hydronic heating and hot water needs while maximizing
efficiency by measuring the Data parameters of your heating system.
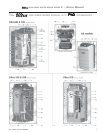
1. Cast aluminum heat exchanger
2. Heat exchanger access cover
3. Blower
The advanced blower design and air inlet silencer (5a) on Ultra boilers
result in very quiet operation.
80 & 105 — Air enters the boiler enclosure through the air intake adapter
(18), flows through the enclosure, enters the air inlet silencer (5a), then
enters the blower. The blower pulls air through the silencer and pushes it
into the venturi (5), where it mixes with gas before entering the burner.
155, 230 & 310 — Air enters the boiler enclosure through the air intake
adapter (18), flows through the enclosure, enters the air inlet silencer
(5a), then enters the venturi (5). The blower pulls air and gas through the
venturi and pushes the mixture into the burner.
4. Gas valve
The gas valve senses the vacuum in the venturi caused by flowing air, and
allows gas to flow when power is applied. The manual gas valve (4a) allows
shutting off the gas supply for servicing or shutdown. Models 80 and 105
use a sensing line (4b) from the gas valve to the blower outlet so the gas
valve references the same pressure as the venturi inlet.
5. Venturi
When air flows through the venturi, it creates a vacuum. This vacuum
pulls gas from the gas valve. So gas will only flow if air is flowing. On 80
and 105 models, the gas air mixture enters the burner after the venturi.
On 155, 230 and 310 models, the gas/air mixture enters the blower
before passing on to the burner.
6. Flue gas sensor
This sensor monitors the flue gas exit temperature. The control module
will shut down the boiler if flue gas temperature gets too hot. This protects
the flue pipe and the heat exchanger from overheating.
7. Outlet water temperature sensor
This sensor monitors boiler outlet water temperature (system supply).
The control module adjusts boiler firing rate so the outlet temperature is
correct.
8. Return water temperature sensor
This sensor monitors return water temperature (system return). The
control module reduces or increases boiler input, depending on how
close the return water temperature is to the outlet water temperature.
9. Temperature and pressure gauge
10. Electronic display & buttons
The 4-digit electronic display is used to:
• Set space heating temperature.
• Show outlet water temperature (normal) or other operating conditions
(in Information mode).
• Show boiler status and shutdown or lockout codes for easy
troubleshooting.
The buttons allow changing display mode and reset after lockout. The
on/off Power switch (10a) turns power to the boiler controls on or off.
11. Flue pipe adapter
12. Burner
Made with high-grade stainless steel construction, the burner
uses pre-mixed air and gas and provides a wide range of firing
rates.
13. Water outlet pipe (system supply)
14. Water return pipe (system return)
15. Gas connection pipe
16.
Control Module
The
Control Module responds to signals from the room
thermostat, supply water sensor, return water sensor, flue gas
sensor and (if used): domestic hot water aquastat, outdoor
temperature sensor, and summer/winter switch. The control
module automatically adjusts blower speed (and gas flow rate)
to match boiler output to space heating and/or DHW heating
demand. The control module is accessed by removing top front
cover (16a).
17. Transformer
The transformer reduces line voltage from 120 vac to 24 vac,
providing 24 vac to the control module for the gas valve and
blower signal .
18. Air intake adapter
19. Electrical entrance cover plate
Remove the electrical cover plate to access the line voltage
terminal strip (19b) and the low voltage terminal strip (19a).
Attach line voltage conduits to the three holes at the left of the
line voltage terminal strip for power, CH pump and DHW
pump. Route low voltage wires through the opening to the right
of the low voltage terminal strip.
20. Boiler drain valve
21. Line voltage receptacle
Use this connection to plug in line voltage meters or tools while
working on boiler. Do not exceed 10-amp load.
22. P/T gauge temperature sensor well
The remote sensor for the panel-mounted pressure/temperature
gauge inserts into the outlet water pipe here.
23. Flue gas condensate drain connection
Connect condensate drain line to ½" PVC tee here. The
condensate trap (23a) and PVC fittings are field-installed.
24. Front door
The front door is sealed to the boiler assembly around its entire
perimeter. Two knurled-head screws (24a) secure the door in
place.
25. Ignition electrode
The burner flame is ignited by applying a high voltage to the
ignition electrode. This causes a spark (from electrode to ground).
26. Flame inspection window
The quartz glass window provides a view of the burner surface
and flame.
27. Data port
External connection to MCBA control for computer interface.


