48
B. HEAT EXCHANGER:
cWARNING: A qualified heating contractor must clean the heat exchanger.
At least once a year, inspect the heat exchanger for evidence of corrosion, pitting, warpage, deterioration,
and carbon (soot) build-up. A layer of soot on the inside of the heat exchanger will act as an insulator and
reduce heat transfer, resulting in less heating efficiency.
Also, look for loose or deteriorated gaskets and insulation around the flue pipe, the burner, and
accessible areas of the heat exchanger. If this inspection indicates heat exchanger cleaning is necessary,
follow the heat exchanger cleaning instructions below.
C. HEAT EXCHANGER CLEANING INSTRUCTIONS:
cWARNING: THE HEAT EXCHANGER MUST BE CLEANED BY A QUALIFIED
SERVICE PERSON.
It is important to inspect and clean the heat exchanger once a year, or as necessary, to remove any build-
up of soot. A layer of soot on the inside of the heat exchanger will act as an insulator and reduce heat
transfer, resulting in less efficiency.
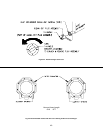
1. To clean the heat exchanger, first turn off all power to the unit. Remove clean-out plugs, the vent
connector pipe to the chimney, the burner, and the burner mounting plates. When removing the clean-out
plugs, turn T-handle counterclockwise approximately two (2) full turns or just until the plug is able to be
pulled from tube. Take care not to remove T-handle from assembly.
2. With access to the inside of the heat exchanger through the burner area, clean-out openings, and vent
pipe connection, it is possible to use a long, flexible wire brush and an industrial type vacuum cleaner to
remove any soot build-up. NOTE: A one inch (outside diameter) vacuum cleaner hose will fit into the
radiator.
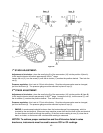
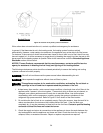
To vacuum and brush the outer radiator of the heat exchanger, go through the clean-out openings in both
directions, as shown in figure 25 on the next page.
3. Reassemble the furnace to its original construction*. Remount the burner being certain that the air
tube is properly inserted into the chamber opening. If heavy soot deposits were found in the heat
exchanger, this may indicate the burner is out of adjustment.
*When returning clean-out plugs to their original position, insert plug and turn T-handle clockwise 2-3
turns or until plug cannot be pulled from the clean-out access tube. This is sufficient for sealing the
access tube.
Replace any damaged or corroded components. All gaskets and insulation must
be inspected, and replaced, if they show any signs of damage.


