


Use and care:
- Fully unroll the appliance’s power
cable before each use.
- Do not use the appliance if the
on/off switch does not work.
- Do not move the appliance while
in use.
- Do not use the appliance if it is
tipped up and do not turn it over.
- Disconnect the appliance from the
mains when not in use and before
undertaking any cleaning task.
- This appliance is for household
use only, not professional or
industrial use.
- This appliance is intended for
adult use. Ensure that this product
is not used by the disabled,
children or people unused to its
handling.
- This appliance should be stored
out of reach of children and/or the
disabled.
- Do not expose the appliance to
extreme temperatures.
- Any misuse or failure to follow
the instructions for use renders the
guarantee and the manufacturer’s
liability null and void.
Installation
Assembly
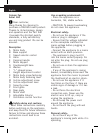
-Fit the Adjustable Column (S)
into the hole in the Support Base
(B), place the counterweight (G)
underneath the Support Base (B)
and secure with the “L” shaped
screw (I) inserting the washer (H)
between the base and “L” shaped
screw (I) (Fig.1)
-Fix the motor body (A) to the
adjustable column (S) through the
support motor (F) and fix in place
with the motor body screw fastening
(K) and the motor body fastening
lever (L) making it coincide
with the appropriate holes. Next
introduce the incline adjustment
screw (M) into the appropriate
hole and tighten it with the inline
adjustment lever (N)
-Unscrew the 4 screws and remove
the washers situated further back
from the front part of the motor
body (A) Using these 4 screws
screw in the rear grate (Q), leaving
the carrying handle (E) on the
upper part of the appliance.
Insert the helix (D) in the motor
shaft (R) until the hole in the helix
coincides with motor shaft groove.
Next use the Helix tightening screw
to tighten it completely.
Position the front grill (P) on to
the back grill (Q), press them
together ensuring that an accurate
fitting between the two grills and
alignment with the clips on the
front grill. Make sure that the hole
in the front grill coincides with the
security screw (O).
To ensure that the front and
rear grills are securely fitted
together secure each one with the
security screw (O). This should
be introduced through the hole so
that the grills cannot be separated
without the help of a tool.