


181818
Tips and Tricks
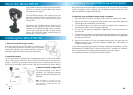
Placing your Security Stickers
One of the most effective aspects of having a security system is the deterring of
would be thieves or intruders. Many potential threats will think twice when they
see that your home is protected by one of the most respected names in security
systems.
To this end, we’ve included a few Swann Security Stickers in your box. They’ll let
any potential problem know before it happens that you’re already on to them! To
get the best results, we suggest placing the stickers somewhere very obvious, a
couple of suggestions being:
1. On your front windows
2. On your side windows
3. Near entrance points, such as doors and gates
4. Next to an obvious camera
5. On the front counter
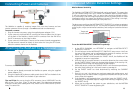
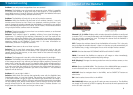
Cable Placement
If you are installing the PNP-50TM cables directly into your walls or ceiling, beware
of placing them too close to electrical cabling. AC power operates at a certain
frequency (50 or 60 hertz, depending on your locale) and this frequency generates
a rather intense electromagnetic fi eld. Running cables too close to a AC cable will
cause noticeable distortion of your images.
Extending Cable Length
It may be the case that you want to connect a camera farther away from the
monitor than the supplied cables allow. Whilst it is possible to do this, please
consider the following:
The longer the cable running from the camera to the RedAlert is, the more 1.
signal loss will occur during image transit. Signal loss will show up fi rst as
fuzziness in the image, followed by image noise and fi nally static (like that on
an un-tuned television screen).
Signal loss becomes a real problem when dealing with longer cables than 2.
those supplied. If you want to use a cable longer than 50m/150ft, be sure that
it is a shielded cable.
Joining cables together is, generally, not recommended. Whilst it is possible to 3.
do this, it usually causes more signal loss than using a longer cable. Of course,
if you are a few feet short with the supplied cable, and just happen to have
your own cables lying around, there’s no harm in trying cables joined together
and seeing what results you get. We do, however, recommend purchasing a
longer cable.
3
Table of Contents
Package Contents
Before you Begin 2
Package Contents 3
Overview 4
Layout of the RedAlert 5
Using and Installing the Wired PNP-50
TM
6
Using and Installing the Wireless Camera 7
Connecting Power and Cameras 8
Attaching the RedAlert to a Television 8
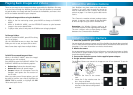
Motion Detection 9
Viewing Live Images 9
Capture Format and Quality Settings 10
Wireless Cameras and Interference 11
Advanced Motion Detection Settings 12 - 13
Playback Images and Videos 14
Accessing Images/Videos via a Computer 15
Troubleshooting 16 - 17
Tips and Tricks 18
Technical Specifi cations 19
3
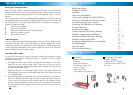
INCLUDED:
RedAlert Receiver/Recorder
Antenna
Instruction Manual
DVR Power Supply (5V)
Video In Cable
Video Out Cable
Theft Deterrent Stickers x 4
OPTIONALLY INCLUDED:
Wireless Camera
Wired PNP-50
TM
Camera
Camera Power Supply (12V)
SD Card