


The Camera features an omni-directional antenna which is most effective when used in the
UPRIGHT position.
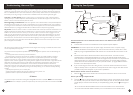
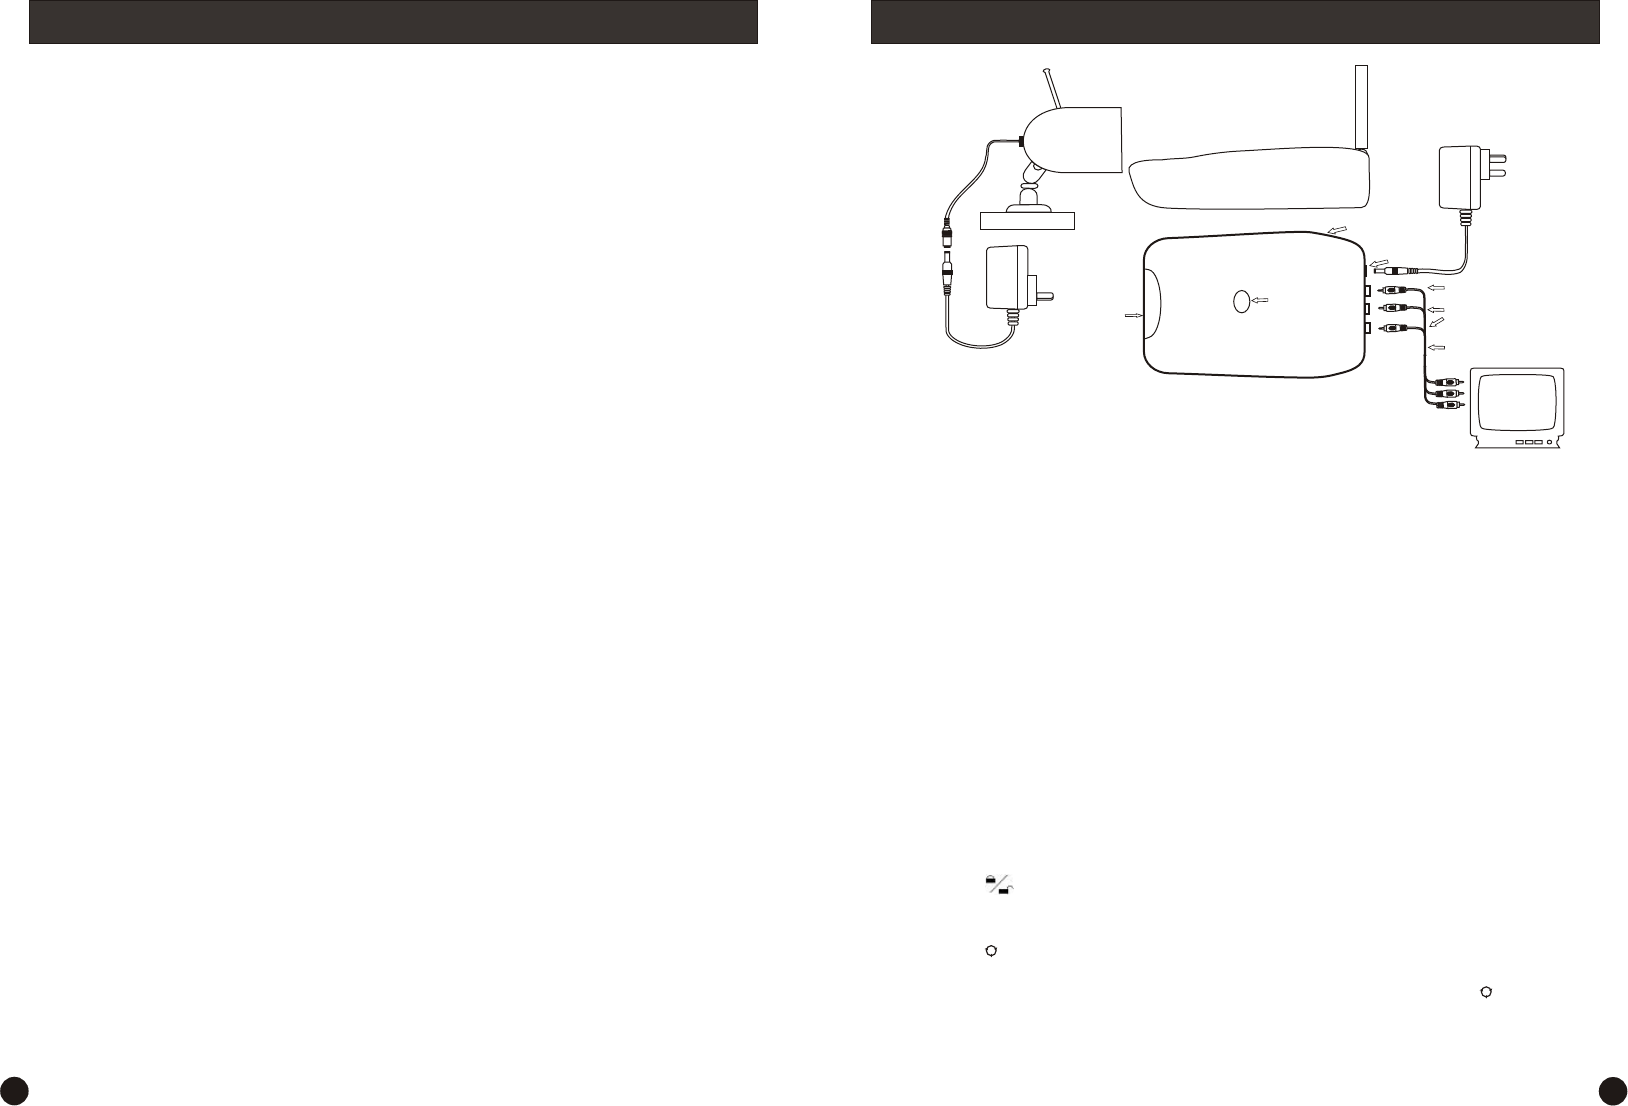
1) Connect both the Camera and the Receiver to their respective power adaptors.
IMPORTANT: The camera requires an 8- 9V power supply, the receiver uses a 12V power supply.
2) Connect the Receiver to the equipment you wish to view the camera on (monitor, AV TV, VCR,
DVR etc) using the supplied RCA-RCA cable and then turn the receiver ON via the switch on the
left.
Direct the antenna of the receiver toward the antenna of the Camera. The antenna can be
swivelled to face in the appropriate direction to a maximum of 180° (90° either side of centre).
Once the antenna is correctly positioned, check the image for clarity and make minor adjustments to
obtain the best picture. obtain the best picture
How to lock the receiver to the current channel.
1) Press the button on the remote control to lock/unlock the receiver to the current channel.
2) Press the button on the remote control to initiate looping mode (”L” should display on the front of
the receiver). Then press the channel number of the camera you wish to view (the channel number
should display on the front of the receiver). To complete looping mode, press the button again to
finish.
“D” on the receiver denotes disable and locks out the other buttons on the remote control.
“E” denotes enable and allows you to use the buttons on the remote control.
3)
In some cases to you will also need to adjust the
position of the Camera and Receiver to suit your particular situation. Try slightly different locations
for either unit to achieve optimal results.
4) If you are mounting the camera to a ceiling or eave, unscrew the camera stand from the camera
body and carefully screw it into position on the top side of the camera using the two holes that are
provided or the picture will appear on your screen upside down.
How to cycle through multiple channels.
on the receiver
Camera with Stand
Small Plug Power Adaptor (8V)
Large Plug
Power Adaptor
(12V)
Video Out
To Video &
Audio IN
Monitor or TV
Left & Right
Audio Out
DC 12V
Socket
A/V Cable
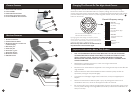
Channel Selector
Button
Active
Channel
Display
Poor Picture: Realign antennas until image quality improves, slightly adjust the position of the Night Hawk Camera
or Receiver. Change the location of the Camera, or use a different Camera in the location experiencing interference
that is on a different channel. In some cases interference may be caused by another device on a similar frequency to
the channel you are using. Change to one of the other 4 available channels and check the signal quality again.
Lines only - no clear picture: Check to confirm there is no microwave oven or other 2.4GHz equipment
operating close by ie; Cordless Telephones, Wireless Baby Monitors, Wireless LAN equipment etc. Make sure the
Receiver is on the correct channel for the particular camera.
Picture ghosting or interference: Some home appliances such as Wireless LANs, 2.4GHz portable telephones
and Microwave ovens operate on or near the 2.4GHz frequency. If you receive interference from such an appliance,
try moving the Camera or Receiver to location further away from the appliance or in the event of interference from a
Wireless LAN device, try changing the Wireless LAN to a different channel to improve the signal quality.
No picture: Check the receiver to confirm it is turned ON and make sure the A/V connection of the Receiver is not
plugged into the Audio Out socket. Make sure the Receiver is on the correct channel. Check that the channel on the
receiver is the set to the same as the camera you wish to view. Check to ensure the camera is plugged in and has
power (cup your hands around the camera and you should see a faint red glow from the IR LEDs). You can use the
infrared lighting facility to pick up a picture inside a dark environment. If your monitor does not display a picture in a
dark environment, check the camera to be certain that infrared lighting is within range of the subject. Try to move the
item within the 6-9ft (2-3m) range of the Cameras IR LEDs or place the Camera nearer to the object until a clear
picture is displayed on the Monitor.
FCC Notice
We, Swann Communications of 10612 Shoemaker Avenue, Bldg A, Santa Fe Springs, CA 90670 USA, declare under
our sole responsibility that the product:
SW233-WOC3
This product meets the requirements specified in Part 15 of FCC Regulation. Operation rests with the following two
conditions:
(1) The equipment should not cause any harmful interference;
(2) The equipment must receive and process any interference, including any possible interference caused by
operation mistakes. After testing the product, we confirm that it complies with the provision for class C digital
equipment in the 15th part in FCC regulation; and the receiver complies with the limitations for class B digital
equipment in Part 15 of FCC regulation. The product generates, applies and emits radio waves. It might cause harmful
interferences to wireless communication if not be installed and used following the description of the manual. The
product may cause interference in residential area, and the customer should take remedies to eliminate the
interference at their own costs. If the product causes any harmful interference to wireless equipment or disturbs the
receiving of TV signals (it can be identified by turning on and off the product), you can solve the trouble by following
methods:
(1) Re-adjust the product or put it in another place;
(2) Extend the distance between the equipment interfered and the product; and
(3) Refer to dealers or experienced radio electrician for help.
CE Notice
This product complies with standards including Low Voltage Device Directive 73/23/EEC; EMC Directive 89/336/EEC
and R&TTE Directive 1999/5/EC. It passed the subject tests by the authority concerned and is authorized to bear CE
mark.
6
3
Troubleshooting, Hints and Tips
Setting Up Your System
ON/OFF
Switch