888
Activating Channels & Loop Mode
The ADW-200 receiver can potentially support up to four cameras. It cannot
display all of these at a time, however. Rather, you can use Loop Mode, which will
sequentially display images from one camera at a time. As you can have between
one and four cameras paired with the receiver, you’ll need to set how many
channels are active, and which channels they are.
Activate Channels
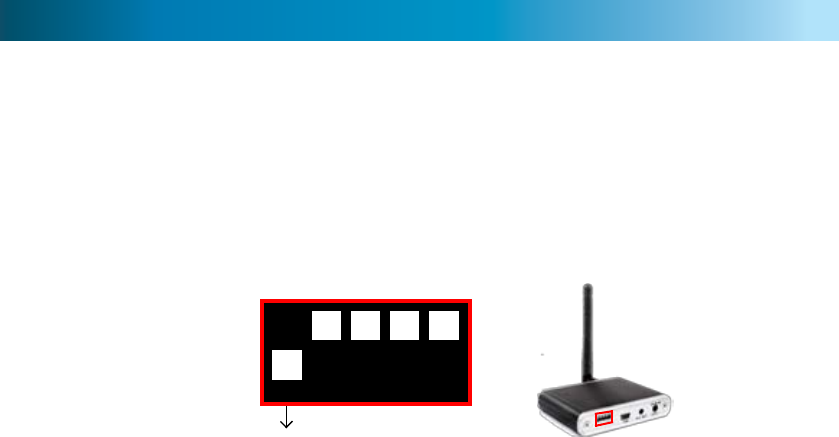
Located on the rear of the receiver you’ll find a series of DIP switches. These are
labelled from 1 to 4, with a fifth switch named “L”.
The switches 1 ~ 4 activate each channel. A channel is ON when the switch is in
the downwards position, as indicated in the diagram. Channels which are activated
in this way can have cameras paired to them, and will be shown in both manual
channel-changing mode - whether or not a camera has been paired to them.
The switch marked “L” toggles loop mode on or off.
Loop Mode
Whilst the L switch is in the downward position, the receiver will automatically
cycle through all active channels, pausing for approximately five seconds on each.
All active channels will be displayed, regardless of whether a camera is paired with
them or not.
Important Note about Loop Mode and Motion Detection
The way that most DVRs (and other motion sensitive recorders) detect motion is
incompatible with using Loop Mode on the ADW-200 receiver. Most DVRs detect
motion by counting how many pixels (the little dots which make up an image)
change between frames (the smallest “chunks” of video data, each one a fraction
of a second in length).
As a result, many DVR’s motion detection function will be triggered each time the
receiver changes the channel it is monitoring. Thus, we recommend not using
Loop Mode when connecting the ADW-200 to a DVR. For the best results, you’ll
need a separate receiver for each camera, each receiver connected to a separate
input channel on your DVR.
1 2 3 4 L
ON


