


Cabinet Series Dehumidifying Dryer 40
First Aid:
In case of eye contact, immediately flush eyes with plenty of water for at least 15
minutes. If irritation persists, see a physician.
6-5 Replacing Worn Desiccant
Caution! Make sure desiccant beds are sufficiently cool before replacing worn
desiccant.
1. Disconnect the electrical and compressed air supply.
2. Remove the rear and side shrouds to expose the desiccant beds.
3. Free the bed covers by removing the hex nuts on the retaining rods and remove the upper screens
from both beds.
4. Remove the desiccant in one of the following ways:
• Vacuum out the desiccant.
• Remove the entire bed from the frame and dump it out. To do this, remove the hose
connections, unclamp the beds, and unbolt from the regen heater assembly.
Make sure the bed interiors are clean.
Important! You should properly dispose of any discarded desiccant.
Consult local disposal regulations for more information.
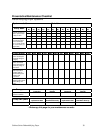
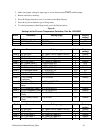
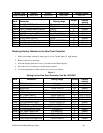
Before re-packing the beds, determine the proper amount of desiccant for the dryer being
serviced. See Figure 14 on the following page for more information. Pre-measured desiccant kits
are available from the manufacturer’s parts department.
Attach the beds to the frame for Steps 5 through 9.
5. Carefully place half of the large bead in the bottom of the beds, in an even layer, on the
bottom screen. Place the small bead on top of it, in an even layer. Carefully place an
even layer of the remaining large beads over the small beads.
6. Install the top screen, making sure that the edge is in contact with the sides of the bed all
the way around. Install the washers and nuts and tighten down. Gently tap the around the
sides of the desiccant canister with a rubber mallet to settle the desiccant. As settling
occurs, re-tighten the nuts. Repeat the tapping and tightening process until little
additional settling occurs.
7. Install the covers and gaskets on the beds, making sure they are tight and sealed. Replace
desiccant bed gasket if necessary.
8. Re-connect any hoses that were disconnected.
9. Re-install the rear and side shrouds. Re-connect the compressed air supply and electrical
power.