


Thank You For Choosing Sterling
We appreciate your commitment to Sterling value. Please take a few minutes to review
this manual before you start installation. If you encounter any installation or
performance problems, please don’t hesitate to contact us. Our phone numbers are listed
within this manual. Thanks again for choosing Sterling.
Merci d’avoir choisi Sterling
Nous apprécions votre engagement envers la qualité STERLING. Veuillez prendre s’il
vous plaît quelques minutes pour lire ce manuel avant de commencer l’installation. Ne
pas hésiter pas à nous contacter en cas de problème d’installation ou de fonctionnement.
Nos numéros de téléphone sont listés dans ce manuel. Merci encore d’avoir choisi
Sterling.
Gracias por elegir los productos de Sterling
Le agradecemos que haya elegido a Sterling por la calidad que ofrece al mejor precio.
Dedique unos minutos para leer este manual antes de comenzar la instalación. En caso
de problemas de instalación o de funcionamiento, no dude en contactarnos. Este manual
contiene nuestros números de teléfono. Gracias nuevamente por escoger a Sterling.
Before You Begin
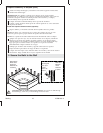
CAUTION: Risk of product damage. Install the bath on an adequately supported,
level subfloor. The basin area requires no additional support when the subfloor is
level and square with the stud framing. Use shims for additional support if the
subfloor is uneven. Do not install the bath over open floor joists.
CAUTION: Risk of property damage. Only apply 100% silicone sealant to the
areas where instructed to do so. Do not add silicone sealant to any other areas.
The inappropriate use of silicone sealant may trap moisture and could result in
mold, leakage, or mildew. For bath-only installations, 100% silicone sealant is
required at the seams of the walls and the bath. We recommend using colored
100% silicone sealant to match the color of the product. Use of latex based or
other caulks is not recommended. If a shower door will be added, you will be
instructed to apply silicone sealant where the front edges of the end wall
surrounds will meet the bath. This will prevent water from passing through the
shower door extrusion to the back side of the wall. Follow the shower door and
silicone sealant manufacturer’s instructions.
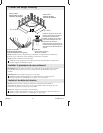
CAUTION: Risk of product damage. Do not lift the bath using the apron brace.
Lift the bath by the rim at multiple points. Bath units in a single carton are
shipped with apron braces in the closed position. Bath units in multi-pack cartons
are shipped with one or more sets of apron braces disconnected at the apron.
Connect the apron braces to the apron before removing the unit from the
carton(s).
IMPORTANT! If your bath is shipped with a liner, keep the liner in place until
construction is complete to prevent surface damage to the unit. If a liner is not
available, place a clean drop cloth or similar material in the bottom of the bath.
Read all instructions before you begin.
Observe all applicable plumbing and building codes.
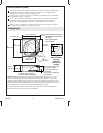
This bath is designed for alcove installations.
Upon receipt, check for shortages or damage. Report any shortages or damage
immediately.
Do not remove the old fixture before you unpack and inspect the new unit.
1072812-2-A 4 Sterling