


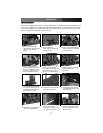

IInnssttaallllaattiioonn
Note: Although FAN939775HP supports a variety of different CPUs, the illustrations below depict installation on an
Intel chipset. Installation steps are identical for both AMD and Intel chipsets, with the exception of the parts used.
When installing FAN939775 on a Socket AM2 system, please ensure that the motherboard already has the AM2
retention module (mounting bracket), and use the K8 clip.
Instruction Manual
3
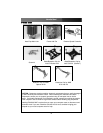
1. Remove the original CPU
cooler and any devices used to
retain the CPU within the
socket.
4. Remove the protective film
from the base on the heat pipe
main unit. Place the main unit
on the CPU, aligning the holes
of the P4 clip with the posts.
7. Put the transparent frame onto
the main unit, directing the fan
as required by the structure of
your computer contents.
5. Place the retention clip inside
the frame of the heatpipe
base, then install the main unit
onto the CPU, being sure to
line the clip up with the posts.
3. Apply enough thermal paste to
the top of the CPU to cover the
entire top surface.
2. Place the base clip
backing onto the backside of
the motherboard
6. Tighten the posts to secure the
heatpipe unit onto the
mainboard.
8. Using the screw kit, screw the
frame into the main unit.
9. Connect the power cord from
the fan speed controller to the
main unit/frame.
11. Secure the fan speed
controller into an open slot on
the back of the computer.
10. Connect the remaining power
cable to the motherboard.
12. Check to make sure the main
unit is securely positioned on
the mainboard.