


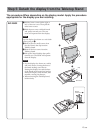

8 (GB)
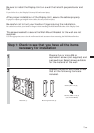
Step 2: Adjust the position of the arm bases
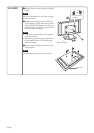
(For the KLV-26HG2 and the KLV-L32M1 only)
1
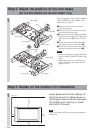
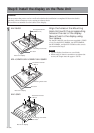
Step 3: Decide on the location for installation
1
If you are going to install a KDL-L32MRX1,
a KLV-L32MRX1 or a KLV-30MR1, skip
Step 2 and go to Step 3.
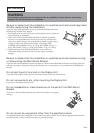
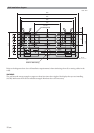
1Remove the four (two for each arm
bases) tilt adjusters .
2Remove the four screws that secure the
arm bases to the Plate Unit.
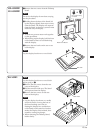
3Remove the arm bases A and put them
in the slots facing inward. Put both arms
and the arm bases B on the arm bases
A.
4Secure the arm bases to the Plate Unit
using the four screws removed in 2.
5Secure the arms to the arm bases using
the four tilt adjusters removed in 1.
Notes
• If you are installing a display other than
the KLV-26HG2 or the KLV-L32M1, skip
Step 2.
•When using an electric screwdriver to
tighten the screws, the torque must be
approx. 2 N•m.
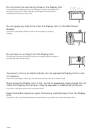
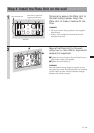
Leave spaces around the display. At
least the amount of space shown in
the diagram should be left between
the display and a ceiling or raised
portions of the wall.
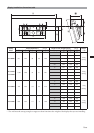
Tip
Refer to the table (9 (GB)) for the display installation
dimensions.
2
2
5
5
3
3
3
4
4
1
1
Arm
Arm base B
Arm base A
Tilt adjuster
Arm
Tilt adjuster
Arm base A
Arm base B
Unit: mm
300
100
100
100
Arm base A
Arm base B
Arm base B
Arm base A