ASSEMBLY INSTRUCTIONS
Tools required: Phillips screwdriver (not included).
Remove the fan and packaging materials from the box.
Stand Fan Base Assembly:
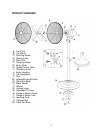
1) Unscrew the locking lever from the bottom of the pole.
2) Turn the pole upside down and slide the opening in the center of the fan base over
the pole. Place the black weight onto the base followed by the washer.
3) Insert the threaded end of the locking lever into the hole of the washer and through
the base into the bottom of the stand. Turn the locking lever clockwise to secure
and tighten the base to the pole.
4) Turn the base over and set it on the floor.
5) On the neck of the fan head, remove the securing knob, carriage bolt and
adjustable tilt knob. Loosen the range of motion screw.
6) Slide the fan head neck over the top of the pole so that the range of motion screw
aligns with the range of motion hole.
7) Insert the carriage bolt into the square slot on the fan head neck and push through
the hole.
8) Tighten the range of motion screw. Screw on the securing knob and the adjustable
tilt knob.
Table Fan Base Assembly:
1) On the neck of the fan head, remove the securing knob, carriage bolt and
adjustable tilt knob. Loosen the range of motion screw.
2) Slide the fan head neck over the top of the table base so that the range of motion
screw aligns with the range of motion hole.
3) Insert the carriage bolt into the square slot on the fan head neck and push through
the hole.
4) Tighten the range of motion screw. Screw on the securing knob and the adjustable
tilt knob.
Fan Head Assembly:
1) Remove the black sleeve and mounting nut from the motor shaft.
2) Position the back grill over the motor shaft, fitting the holes in the back grill over the
knobs that protrude from the motor. Make sure the rear grill fits securely against
the motor housing and the handle is at the top.
5


