


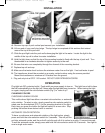

B. Use a Phillips head screwdriver to remove the three screws
retaining the heat diffuser/heat shield. (See Fig 3) Place the
screws in an area where they will not be lost. Carefully re-
move the round
diffuser/heat shield.
C. Remove one of the three colored bulbs from its box being
careful not to touch the face of the bulb. Place the legs of the
bulb into one of the three ceramic outlets as shown in Figure
3. Repeat for the other two bulbs. NOTE: It does not matter
which bulb goes where.
D. Remove the bulb from its box being careful not to touch the
lens of the bulb. Install the bulb by pressing the two bronze
legs of the bulb into the ceramic socket in the light housing as
shown in FIG. 4. Repeat for the other two bulbs and sockets.
E. Be sure that the bulbs are firmly pressed into the socket.
F. BE CAREFUL NOT TO BURN YOURSELF, AS THE BULBS
GET HOT QUICKLY AND SHOULD BE TURNED OFF IMMEDI-
ATELY UPON SUCESSFUL TEST. OPERATION OF THIS FIX-
TURE OUT OF WATER FOR ANY PROLONGED TIME WILL
DAMAGE UNIT AND VOID WARRANTY.
Plug the light into wall outlet. Turn switch on. If light comes on,
press color selector switch (FIG 6) and be sure all bulbs are
working, if so test successful. Unplug the unit. Move to step G.
If light does not turn on, unplug unit from wall and reinstall light
bulb. Repeat test again, if still not working call Smartpool cus-
tomer service at 732- 730-9880.
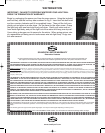
G. Carefully install the round diffuser/heat shield into the light box as
shown in figure 5. Be sure that the glass has its textured (rough)
side facing away from the bulb. Reinstall all three screws
H. Carefully replace the lens making sure that there is an even flat
fit in the light body.
I. Place the seal ring carefully over the lens making sure it is on
straight. Now turn in a clockwise direction until the ring begins
to tighten up. You may hear a clicking sound which is normal.
This is a safety feature designed to not allow the light seal to
loosen up or be removed without the key.
J. Continue to turn clockwise until the index mark on the seal ring
is even with the light body as shown in Figure 4. NOTE DO
NOT OVERTIGHTEN OR TURN BACK SEAL RING IN A
COUNTER CLOCKWISE FASHION AS THIS WILL CAUSE
LEAKAGE!
K. Light is ready to install.
2007 NLMC Manual:Layout 1 1/17/07 11:43 AM Page 2