


45
NOTE:Ittakespracticetosewblindhems.Doatestsewrst.
NOTE: In addition to the adjustment on the foot, the stitch width control
can be used. The stitch width control changes the swing of the needle for a
narrower or wider stitch.
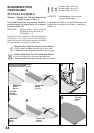
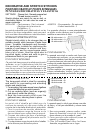
1. Avec un fil assorti, cousez le rebord coupé. Sur un tissu léger, faites un rebord
d'environ 1,3 cm (1/2 po) ou moins et repassez. Sur un tissus moyen ou épais,
surjetez le rebord coupé.
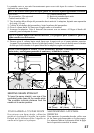
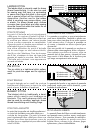
2. Maintenant, pliez le tissu comme indiqué dans l’illustration, l’envers tourné vers le
haut.
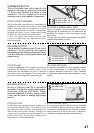
3. Placez le tissu sous le pied. Faites tourner le volant à la main vers vous (sens
antihoraire) jusqu'à ce que l’aiguille se déplace complètement vers la gauche. Elle
ne devrait percer que le repli du tissu.
REMARQUE: en plus des ajustements possibles sur le pied, le contrôle de la
largeur du point peut être utilisé. Le contrôle de la largeur du point change le
déplacement de l'aiguille pour un point plus ou moins large.
NOTA: Para una puntada invisible más angosta o ancha, primero ajuste los controles
de largo y ancho al largo y ancho deseado. El control de ancho de puntada cambia el
movimiento de la aguja, ensanchando o alargando la puntada.
REMARQUE: la couture d’ourlets invisible demande de la pratique. Pour débuter
faites un essai de couture.
NOTA: Se debe tener práctica para poder hacer costuras invisibles. Haga una prueba de
costura primero.
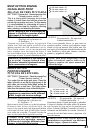
1. With matching thread nish the raw edge. On ne fabric turn up and press a small
½” (1.3cm) or less hem. On medium to heavyweight fabrics overcast the fabric’s raw
edge.
2. Now fold the fabric as illustrated with the wrong side up.
3. Place the fabric under the foot. Turn the handwheel towards you (counter-clockwise)
by hand until the needle swings fully to the left. It should just pierce the fold of the
fabric.
1. Primero terminar el borde. Para esto, doblarlo sobre el material no y sobreorillarlo sobre el
material de peso medio pesado. Entonces doblarlo según la profundidad y presión necesarias.
2. Ahora doble el material tal como está ilustrado con el reverso hacia arriba.
3. Coloque el material debajo del pie. Gire el volante hacia usted a mano hasta que la aguja se
mueva completamente hacia la izquierda. Deberá solo atravesar el pliegue del material.
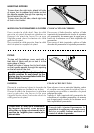
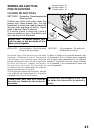
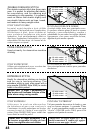
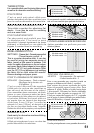
Sew slowly, guiding the fabric carefully along the edge of the guide.
Effectuez la couture lentement, tout en guidant soigneusement le tissu le long du
bord du guide.
Cosa lentamente, guiando el material cuidadosamente a lo largo del borde de la guía.
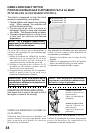
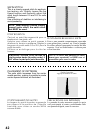
4. When completed, the stitching is almost invisible on the right side of the fabric.
4. Lorsque l’ourlet est terminé les points sont presque invisibles sur l’endroit du tissu.
4. Una vez terminado, los puntos son casi invisibles sobre el lado derecho del material.