


ASSEMBLY
-5-
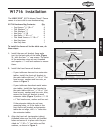
Figure 2. Rear fence rail bracket.
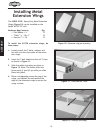
Figure 4. Installing fence tubing.
W1716 Installation
The SHOP FOX
®
W1716 Aluma-Classic™ Fence
comes in a box with its own hardware bag.
W1716 Hardware Bag Contents: Qty
• Cap Screws
5
⁄16"-18 x 1" 4
• Flat Washers
5
⁄16" 8
• Flat Washers
1
⁄4" 6
• Hex Nuts
5
⁄16"-18 8
• Hex Bolts
1
⁄4"-20 x
3
⁄4" 6
• Flat Head Screws
5
⁄16"-18 x 1" 4
• Hex Key 6mm 1
• Hex Key 4mm 1
To install the fence rail to the table saw, do
these steps:
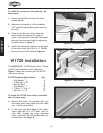
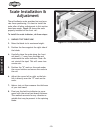
1. Install the rear rail bracket (long angle
iron) to the back side of the table (
Figure
2), with the four
5
⁄16" cap screws. The holes
in the extension wings are not threaded
and require
5
⁄16" nuts and washers to secure
them.
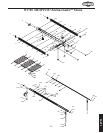
2. Install the front fence rail bracket.
— If your table saw has cast iron extension
tables, install the front rail bracket to
the main table with two
5
⁄16"-18 x 1" flat
head screws, washers and hex nuts, as
shown in Figure 3
.
— If your table saw has sheet metal exten-
sion tables, install the front bracket to
the main table with
two
5
⁄16"-18 x 1" flat
head screws, washers and hex nuts. Also,
secure the front rail bracket to each
extension table
(Figure 3) with a
5
⁄16"-18
x 1" flat head screw, washer and hex nut.
If the extension tables do not have
mounting holes, or if the holes in the
front fence rail bracket and extension
tables do not align, drill
5
/16" holes into
the extension tables.
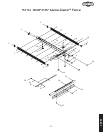
3. Align the front rail (rectangular tubing)
threaded holes over the front rail bracket
holes and secure it in place with the pro
-
vided six
1
⁄4"-20 x
3
⁄4" hex bolts and flat
washers, as shown in Figure 4
.
Figure 3. Front fence rail bracket.
Main Table Mounting
Locations
Sheet Metal Extension
Wing Mounting Locations
5
/16"-18 x 1" Cap Screws