


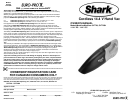

OPERATING INSTRUCTIONS
Charging Your Vacuum Cleaner
3
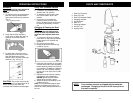
1. Place the vacuum cleaner and
charging adapter near an electrical
power outlet (120 V., 60 Hz.) and plug
in the charging adapter‘s jack into the
vacuum.
2. Plug the charger into wall outlet.
3. The charging indicator light will shine
red to indicate that the charging jack is
properly inserted into the charging
receptacle at the rear of the unit and
that the unit is being charged. (Fig. 1)
Note:
Ensure that the On/Off switch is
in the "Off" position before charging.
Before Use
1. This cordless hand vacuum is
powered by rechargeable nickel-
cadmium batteries. Before using the
vacuum, charge the vacuum cleaner
for a minimum of 20 hours.
Note
: Ensure that the On/Off switch is
in the “Off” position before charging.
Note: Peak performance may only be
realized after the unit has been charged
and discharged two (2) or three (3) times.
IMPORTANT: To maintain peak
performance of your cordless hand
vacuum, it is recommended that the unit
be fully discharged, then completely re-
charged at least once a month.
Charging
Receptacle
Charging
Jack
Fig. 1
To Maximize the Life of your Ni-Cd
Batteries
1. Charge for a minimum of 20 hours
before initial use. Failure to do so
will reduce the product’s battery life
significantly.
2. Do not store the unit with the
charging adaptor attached and
plugged in.
3. Only recharge when the batteries
are fully discharged (or as close to
fully discharged as possible).
4. Do not store in areas of high
temperature or humidity.
5. Fully discharge, then completely
re-charge the unit at least once a
month.
6. After three (3) months of storage, the
product should be fully discharged
and then recharged to maximize
battery power.
7. Use only the charger supplied with
the product. If other chargers are
used, the batteries can fail causing
damage to the battery, product or
personal property.
8. Ni-Cd batteries have a long useful life
but at some time they will need to be
replaced. To purchase replacement
batteries visit www.sharkvac.com.
Note:
1. The on/off switch must be in the
“OFF” position in order to charge the
unit. If the charging indicator does not
light, depress the on/off switch once.
2. If the product has never been used or
has been stored for an extended
period of time without use – it will take
several complete charge and
discharge cycles to realize the full
operational time of your product.
4. The normal full charging time for this
vacuum is 20 hours. The vacuum
cleaner will run for maximum
operational time only if it has been
fully charged. To fully charge the unit,
run the vacuum cleaner until it stops,
then fully recharge the battery.
OPERATING INSTRUCTIONS
Battery Pack Replacement &
4
Disposal
WARNING: NEVER use ordinary
batteries for replacement, as these may
leak and damage your vacuum cleaner.
Use only battery pack XB7729 provided
by EURO-PRO Operating LLC for
replacement.
This vacuum cleaner contains a nickel-
cadmium (Ni-Cd) batteries, which must
be recycled or disposed of properly in
accordance with state, federal and local
laws. Call your nearest recycling center
for information on the recycling and
disposal of nickel-cadmium (Ni-Cd)
batteries.
If uncertain as to how to remove the
battery pack, we suggest you take your
wet/dry hand vacuum to a reputable
small appliance service technician to
have this service preformed.
The battery pack of your SV7729 is
replaceable, however care should be
taken when doing so. Follow these steps
when replacement is required:
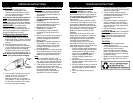
1. Open the battery pack compartment
by removing the single Phillips head
screw located in the recess at the
rear of the unit. NEVER open the
battery compartment except to
change the battery pack when
required.
2. Remove battery compartment cover.
Set aside battery compartment cover
with the screw.
3. Carefully detach the two (2) electrical
connectors from the battery pack by
pulling straight out from the battery
pack.
4. Lift out the battery pack and set
aside.
5. Insert the new battery pack and re-
connect the terminals by pushing lead
wires onto battery tabs.
6. Tuck the wiring inside the battery
compartment so that the wiring does
not interfere with the battery
compartment cover when it is
replaced.
7. Re-install the battery compartment
cover by sliding it over the battery
towards the front of the unit, making
sure that the front snap engages the
body of the unit.
8. Replace the battery compartment
cover screw.
CAUTION: NEVER use the unit without
the battery compartment cover in place.
Note:
Any other servicing should be
performed by an authorized service
representative.
CAUTION
• Use only with the battery pack
supplied with the unit.
• Do not attempt to remove the battery
pack from the unit to charge it.
• Never attempt to throw the battery
pack or unit into a fire or incinerate it.
• Do not attempt to remove or damage
the battery casing.
• Battery must be recycled or disposed
of properly at the end of it's service
life.