


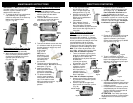


Emptying & Cleaning the Cyclonic
Chamber
Periodically the cyclonic chamber will
need to be emptied and cleaned. This
does not have to be done every time the
dust cup is emptied but it is recommended
that you empty the cyclonic chamber
every three (3) months depending on use
or prior to the dust in the cyclonic
chamber reaching the “MAX” fill line. If dirt
level is not visible, clean every three
months.
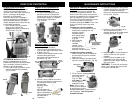
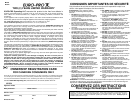
To empty the cyclonic chamber:
1. Hold the cyclonic chamber from the
handle over a garbage can and
press the cyclonic
chamber bottom
door release button
to empty the dust.
(Fig. 29)
2. After emptying
the cyclonic
chamber,
replace it onto
the dust cup and
place the dust cup
assembly into the vacuum.
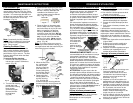
3. Fill the cyclonic chamber half way
with water through
the rinsing port.
(Fig. 31) Use
only water. Do NOT
use any type of
detergent or soap.
Note: You can also
fill the cyclonic chamber
by opening the cyclonic
chamber bottom door instead of using
the rinsing port. Only fill cyclonic
chamber half way.
Fig. 32
4. Close the rinsing port or the cyclonic
chamber bottom door and shake the
cyclonic chamber thoroughly to
remove any dust that has adhered to
the cyclones. (Fig. 32)
Fig. 31
Fig. 33
6. Repeat steps 2 to 5 as necessary to
remove all dirt from the cyclonic
chamber.
7. Let the cyclonic chamber air dry
completely for 24 hours with the
bottom door open before replacing
into the vacuum.
WARNING: To avoid risk of electrical
shock, never operate the vacuum with
the cyclonic chamber wet.
Fig. 29
Cyclonic Chamber
Bottom Door
Release Button
To clean the cyclonic chamber:
1. Make sure that you have emptied all
the dust from the cyclonic chamber
before rinsing.
2. Open the rinsing port located at the
top of the cyclonic chamber. (Fig. 30)
Rinsing Port
Fig. 30
5. Hold the cyclonic chamber over a
sink and press the cyclonic
chamber bottom door release button
to empty the water. (Fig. 33)
MAINTENANCE INSTRUCTIONS
9
DIRECTIVES D’ENTRETIEN
40
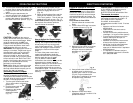
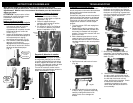
Séparer le bac à poussière du
collecteur cyclone
1. Enlever le bac à poussière
2. En tenant l’assemblage du bac à
poussière, tourner la poignée de
transport dans le sens contraire des
aiguilles pour séparer le collecteur
cyclone du bac à poussière.
(Fig. 23 et 24)
Fig. 23
Fig. 24
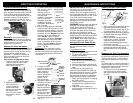
Fig. 26
Écran de débris
3. Enlevez l’écran à débris et rincez-le
dans de l’eau tiède en le tenant sous
le robinet pour enlever toute
poussière qui
adhère à l’écran.
(Fig. 27)
Ne PAS mettre au
lave-vaisselle. Laissez
sécher complètement
(24 heures) avant de
réinstaller dans
l’aspirateur.
Nettoyer le bac à poussière &
l’écran de débris
Pour enlever l’écran de débris:
1. Tenez le bac à poussière dans une
main et avec l’autre main tenez l’écran
à débris. (Fig. 25)
2. Tournez l’écran à débris dans le sens
contraire des aiguilles pour
déverrouiller et enlevez du bac à
poussière. (Fig. 26)
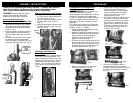
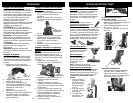
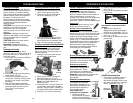
Enlever le bac à poussière
ATTENTION: Toujours débrancher
l’unité de la prise électrique avant
d’enlever et de vider le bac à poussière.
Sinon il y a danger de décharge
électrique ou de blessures.
Pour vous assurer que l’aspirateur
continue de nettoyer en profondeur, le
bac à poussière doit être vidé après
chaque utilisation et/ou chaque fois que
la ligne MAX est atteinte.
1. Pour enlever le bac à poussière,
appuyez sur le bouton de
dégagement du bac à poussière et
enlever le bac. (Fig. 20)
Fig. 20
PRESSER
ATTENTION: Ne PAS pousser le
bouton de dégagement de la porte
inférieure du collecteur cyclone pendant
que le collecteur cyclone est encore
attaché au bac de poussière.
2. Pour vider la bac à poussière, tenez
le bac au dessus d’une poubelle
(Fig. 21 et 22)
Fig. 21
Presser
Fig. 22
Fig. 25
Tenir par
le bas
Tenir &
Tourner
Fig. 27