


10
TOLL FREE: 1-800-798-7398
11
www.sharkclean.com
F
ilt
e
r
a
c
c
e
s
s
E
m
p
t
y
d
u
s
t
c
u
p
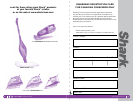
Maintenance
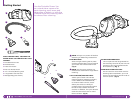
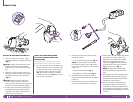
EMPTYING THE DUST CUP
The Dust Cup needs to be emptied
each time you vacuum and
periodically during cleaning, when
the Dust Cup appears full.
1 Remove the Flexible Hose and Hose
Connector from the Vacuum by
pressing and holding the release
button on the side of the Hose
Connector (fig. a) while you slide it
toward the front of the Vacuum
(fig. b) and lift out. (fig. c)
2 Hold Vacuum over a trash receptacle
and press the Dust Cup Release
Button to release the door. Tap
gently to empty contents. (fig. d)
3 Press the door shut again until it
clicks.
4 Check to make sure door is secure
before turning the Vacuum on.
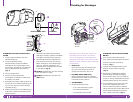
7 Make sure all filters are completely
dry before inserting back into
Vacuum.
8 To re-insert Filters:
• Place the Large Felt Filter into
Vacuum first.
• Next, place the Large Foam Filter.
• And finally, place the Filter Holder
with Small Foam Filter tucked
inside.
9 Align locking grooves of the Dust
Cup with tab on the Vacuum body.
First push the Dust Cup down and
then to the left (fig. d) until you
hear the Filter Access Button lock
securely in place and the Black
Triangle on the Dust Cup is aligned
with the ‘Locked’ Symbol on the
Vacuum
DO NOT operate the vacuum without
ALL the filters in place.
DO NOT operate the vacuum with
WET filters.
CLEANING THE PRE-MOTOR FILTERS
1 Stand the Vacuum up with the Dust
Cup on the top and the Handle facing
you.
2 Slide the Filter Access Button
upward to unlatch the Dust Cup from
the Vacuum. (fig. a)
3 While holding the Filter Access
button, twist the Dust Cup to the
right (fig. b) so that the Black
Triangle on the Dust Cup aligns with
the ‘Unlock’ Symbol on the Vacuum.
4 Remove the Dust Cup and pull out
the gray Filter Holder with Small
Foam Filter. Pull out Large Foam and
Felt Filters. (fig. c)
5 Rinse all filters thoroughly in
lukewarm water until the water runs
clear.
6 Squeeze out excess water and let air-
dry for 24 hours before replacing; do
not use hair dryer or other heating
methods to dry.
Filter Access
a
b
c
Pre-Motor
Filters
d
d
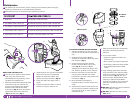
Rinse and dry every month under normal use.
Empty each time you clean.
Pre-Motor Foam Filters (2)
Dust Cup
Rinse and dry every month under normal use.
Pre-Motor Large Felt Filter (1)
Rinse and dry every 6 months under normal use.
Post-Motor Foam Filters (1)
DO NOT rinse Post-Motor Felt Filter
Post-Motor Felt Filters (1)
1
2
3
4
5
a
b
c
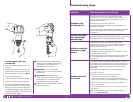
To reduce the risk of electric shock, unplug the unit before performing any
cleaning, maintenance, or troubleshooting checks.
Reassemble all parts securely before operating vacuum.