


To Maximize The Life Of Your Ni-cd Batteries
1. Charge for a minimum of 20 hours before initial use. Failure to do so will reduce
the product’s battery life significantly.
2. Do not store the unit with the charging adaptor attached and plugged in.
3. Only recharge when the batteries are fully discharged (or as close to fully
discharged as possible).
4. Do not store in areas of high temperature or humidity.
5. After three (3) months of storage, the product should be fully discharged and then
recharged to maximize battery power.
6. Use only the charger supplied with the product. If other chargers are used, the
batteries can fail causing damage to the battery, product or personal property.
7. Ni-Cd batteries have a long useful life but at some time they will need to be
replaced. To purchase replacement batteries and parts visit www.sharkompany.com.
Note: If the product has never been used or has been stored for an extended period of
time without use – it will take several complete charge and discharge cycles to realize the
full operational time of your product.
5
OPERATING INSTRUCTIONS
Battery Removal & Disposal
Note: If uncertain as to how to remove your battery pack, we suggest you take your
sweeper to a reputable small appliance service technician to have this service
performed.
Follow the steps in “Removal of Battery Pack” when battery removal is required.
This sweeper is equipped with Ni-Cd batteries and you need to dispose of them properly.
When the batteries are no longer good for use, they must be removed from the sweeper
for disposal. Do not remove the batteries for any reason other than disposal of them.
Call your nearest recycling center for information on the recycling and disposal of
Ni-Cd batteries.
Warning: You must never use ordinary batteries for replacement as these may leak and
cause damage. Use only battery pack XBV1917 provided for replacement.
8
OPERATING INSTRUCTIONS
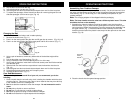
Cleaning The Dust Container
Fig. 10
Fig. 9
Fig. 11
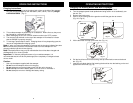
To achieve the best performance, empty the dust container after each use.
1. Press the dust cup release lever with your foot. (Fig. 9)
Note: Be careful not to accidentally turn the unit “On”
2. Lift out the dust container, which is connected to the handle. Hold over a trash bin
and push down on the no touch empty button located on the handle. (Fig. 10)
3. To close the dust container press firmly on the bottom panel until it snaps back into
place. To replace the dust cup, position onto the sweeper power head and press
down firmly until it snaps back into place.
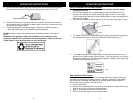
4. Periodically remove the transparent brush cover on the front of the cordless
sweeper and remove any build up of lint, hair or fiber on the rotating brush.
To remove the cover - grip the cover from the bottom, pull out and upward until the
cover unlocks from the side slots and tabs located on the top of the sweeper.
Carefully cut away threads or hair with scissors. (Fig. 11)
Caution: Do not accidentally turn unit on while cleaning.
Caution: Any electronic or electrical appliance should not be stored in or
exposed to areas of high heat or humidity. Do not store your cordless sweeper
close to stoves, radiators, furnaces or in a bathroom or bathing area.
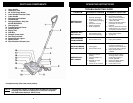
One Touch
Empty Button
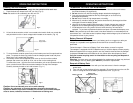
Removal of Battery Pack
1. Press the dust cup release lever with your foot and remove it from the sweeper
power head.
2. Turn unit over so that the base is facing upwards. Be careful not to turn the unit ON.
3. Push in locking tab and lift off battery compartment cover. (Fig. 3 & 4)
Fig. 3
Battery Case Tab
Battery Pack
Compartment Cover
Fig. 4