


7
4. Flush ball will not open.
5. Flush ball does not open
completely. Applies to
short-base units mounted
on step or riser only.
6. Water does not shut off in
toilet (toilet overows).
7. Hand spray unit leaks.
8. Water does not enter toilet
bowl properly.
9. Water is leaking from
water valve.
10. Water is leaking from
bottom of toilet base.
11. Water is leaking from rear
of toilet bowl.
12. Water is leaking from the
base/toilet connection.
a. Broken shaft.
b. Shaft not fully engaged in the
spring cartridge.
a. Floor ange interferes with ush
ball rotation.
a. Not enough clearance between
cam strap and top of water valve
cap.
b. Dirt lodged in water valve seal.
c. Worn or defective water valve.
d. Worn or defective spring cartridge.
a. Hand sprayer is defective.
a. Insufcient water ow rate at toilet.
b. Water valve clogged.
c. Plugged rim wash holes in toilet.
a. Water valve body cracked due to
freeze damage.
b. Water line connection is loose or
not seated properly.
c. Defective water valve.
d. Stripped threads.
a. Toilet is not secured to oor.
b. Worn or defective toilet mounting
oor seal.
c. Cracked base.
d. Worn or defective oor ange.
a. Worn or defective vacuum
breaker.
b. Loose vacuum breaker.
c. Cracked or defective toilet bowl.
a. Band clamp may be loose.
b. Ball/bowl seal may be worn
or defective.
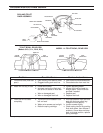
a. Replace shaft.
b. Put pressure on shaft from under
the ush ball (pushing into spring
cartridge) until it engages. You
may have to rotate ush ball
slightly until shaft lines up with
square in spring cartridge.
a. Loosen mounting bolts and push
toilet base back. If this does not
solve problem, install a SeaLand
Universal Mounting Kit (part no.
310139, 310140, or 310141) with
existing oor ange.
a. Adjust cam strap to have .02"
- .06" (.5mm - 1.5mm) clearance
with top of water valve cap.
b. Dissassemble and clean water
valve.
c. Replace water valve.
d. Replace spring cartridge.
a. Replace hand sprayer.
a. Check water ow rate at toilet.
Rate should be 2 gpm (7.6 lpm)
at toilet.
b. Remove and clean screen
located at inlet of water valve.
c. Clean holes. If still a problem,
replace the toilet bowl.
a. Replace water valve.
b. Insure that threads are not cross-
threaded and tighten.
c. Replace water valve.
d. Replace water valve.
a. Tighten toilet mounting bolts.
b. Replace oor seal between oor
ange and toilet base.
c. Replace base assembly.
d. Replace oor ange.
a. Remove white cap from vacuum
breaker. Flush toilet. If water
leaks during ush, vacuum
breaker needs to be replaced.
b. Secure vacuum breaker
connection. If loose, push
breaker into bowl.
c. Replace toilet bowl.
a. Remove plastic base cover and
tighten the band clamp.
b. Replace ball/bowl seal.
TROUBLESHOOTING GUIDE (cont'd)
Problem Possible Cause Service Instructions