


3
HOW TO ASSEMBLE
CAUTION: Completely assemble vacuum cleaner before
using.
Handle styles may vary. One handle has four snap pins on
the back side of the handle, the other handle has two snap
pins on each side. The cord hooks may be different.
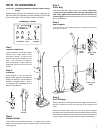
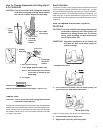
Step 3
Handle Socket
Push handle into handle socket E so handle grip curves
away from the cleaner. Align the holes, insert the 2-part bolt
C and tighten.
Step 2
Fastener
Push fastener B into a hole and
apply thumb pressure so fastener
snaps into position. Secure second
fastener. Repeat steps 1 and 2
to complete the assembly of the
handle. See Detail B.
Step 1
Handle Connector
Push connector A into the upper
handle and align holes. One
connector, shown, is fl at on one
side and the 4 pins snap into one
side. The connector in Detail A
has 2 snap pins on each side and
alignment tabs that slide into the
handle.
Detail A
Detail B
B
A
B
E
C –
Assembly Packet
Tab
D - BAG
SCREWS
C - 2-PART
BOLT
B -
FASTENER
A - CONNECTOR
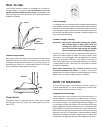
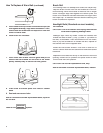
Step 4
Outer Bag
Hold outer bag with zipper away from handle.
Important:
To provide a good gasket seal, the bag coupling must
seat fi rmly against the motor base and not overlap the
furniture guard.
Start the bag screws D by hand, then tighten
with a screwdriver.
Step 5
Bag Support
Loop the spring F onto the bag support G, located to the back of
the upper cord hook.
Step 6
Cord Storage
Secure the cord in the guide below the upper cord hook as
shown or secure the cord into the side of the upper cord
hook.
Secure cord into lower cord hook. Pull up on cord to tighten
but leave slack near the base so the cord does not strain when
the handle is lowered for use. Wrap the cord around the cord
hooks. Fasten the plug to the cord to prevent unwinding.
D
E
Upper Cord
Hook
Upper
Guide
Lower Cord
Hook
C–
F
G
G
G
G
G