


V53i & V53e Operation and Installation Manual 33
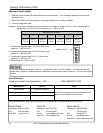
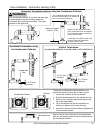
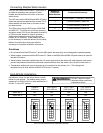
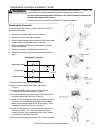
High Altitude Installations
0-2000 ft
(0-610 m)
2001-5200 ft
(610-1585 m)
5201-7700 ft
(1585-2347 m)
7701-10200 ft
(2347-3109 m)
Switch No. 2 OFF OFF ON ON
Switch No. 3 OFF ON OFF ON
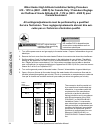
Set switches 2 and 3 to the values shown in table
below for your altitude. The default setting for the
appliance is 0-2000 ft (0-610 m) with switches No. 2
and No. 3 in the OFF position.
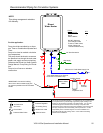
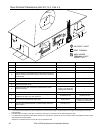
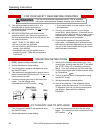
Connecting Multiple Water Heaters
The V53i can use the EZConnect™ cable which is
an optional accessory that connects 2 water
heaters and allows them to function as one hot
water source.
The V53i can use the MSA-2M and MSA-2S packs
which are optional accessories that connect 2 to 5
water heaters and allow them to function as one
hot water source.
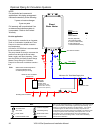
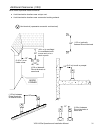
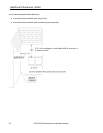
The V53e cannot use the EZConnect, MSA-2MB,
and MSA-2S. The V53e can use Rinnai pressure
activation valves (PVA’s) can be used to manifold 2
to 5 Rinnai water heaters in order to produce a
stable water temperature and allow the water
heaters to run efficiently. Water heaters will turn
on as necessary to meet the demand for hot water.
Refer to the instructions that come with the
accessory for complete installation information.
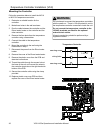
Number of
Connected
Water Heaters:
Accessories Necessary:
2
(1) EZConnect™ Cable
or (1) MSA-2M
3
(1) MSA-2M
and (1) MSA-2S
4
(1) MSA-2M
and (2) MSA-2S
5
(1) MSA-2M
and (3) MSA-2S
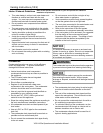
Guidelines
• Do not install both the EZConnect™ and the MSA packs because they are not designed to operate together.
• Water heaters connected with the EZConnect™ Cable or the MSA-2M and MSA-2S packs cannot be used for
the bath fill function.
• Water heaters should be installed less than 18 inches apart so that the cables will reach between units and to
prevent temperature fluctuations (cold water sandwich effect) when the water is shut off and turned back on.
• Temperature settings can only be changed on the controller for the primary unit. (This changes the
temperature on all units within the MSA or EZConnect™ system.)
WARNING
DO NOT adjust the other
switches unless specifically
instructed to do so.
Switch No.
F
O
F
8
5
7
6
4
3
ON
1
2
Switch No.
F
O
F
8
5
7
6
4
3
ON
1
2
Switch No.
F
O
F
8
5
7
6
4
3
ON
1
2
Switch No.
F
O
F
8
5
7
6
4
3
ON
1
2