


RV53i & RV53e Operation and Installation Manual 33
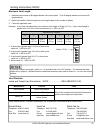
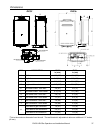
Temperature Controller Installation
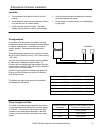
1. Determine a suitable location for the controller.
2. Make three holes in the wall as shown.
3. Run the cable between the controller and the Rinnai water
heater or the controller and another controller.
4. Remove the face plate from the temperature controller
using a screwdriver.
5. Connect the cable to the temperature controller.
6. Mount the controller to the wall using the holes drilled in
step 2.
Do not attempt to connect the temperature controllers with the power on. There is 120
volt potential, next to the temperature controller connections inside the unit.
Do not connect the temperature controller to the 120VAC terminals provided for
the optional solenoid drain valves.
All service and wiring should be performed by a registered installer.
WARNING
securing screw
1-21/32"
3-5/16
"
securing screw
wiring hole
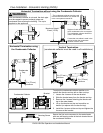
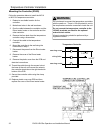
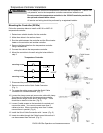
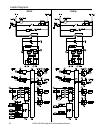
7. Disconnect the power from the water heater.
8. Remove a screw on the Quick Cable Connector.
(Fig. 1)
9. To access the cable screws rotate the Quick Cable
Connector 90º counterclockwise. (Fig. 2)
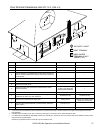
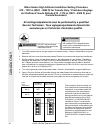
Mounting the Controller (RV53e)
Follow the procedure below to install an MC-91 or MCC-91
temperature controller.
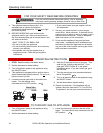
Temperature Controller
10. Loosen the clamp screw and secure wire cable with clamp.
The clamp is in the box with the temperature controller.
Make sure the length of the wire is long enough. There
should be no tension in the wire. (Fig. 3)
11. Loosen 2 cable screws on the terminals for controls and
connect the cable. You cannot connect more than 2
cables at a time. When connecting more than 2 cables,
connect them in parallel. (Fig. 4)
12. Install the Quick Cable Connection with 1 screw. (Fig. 5)
13. Insert wire cable through the Cable Access Hole so that it
can be accessed from the back. (Fig. 2)