


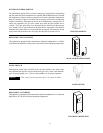
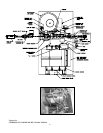

2.4 Check the Gas Supply Pressure, Location (1)
• Leave pilot gas valve and main gas shut-off valve closed;
• Slowly turn on main gas shut-off valve;
• Read the gas supply pressure from the manometer;
• If pressure is > 14" W.C.; Turn off the valve;
• Check if the service regulator is installed and/or adjust the service regulator.
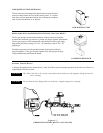
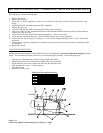
2.5 Install “Monkey” switch, Location (5)
The “Monkey” switch is a remote on/off switch controlling the first gas valve.
• Disconnect the purple/black wire from the black wire on the gas valve
• Install remote switch in between using wire nuts
3.0 START-UP
3.1 Blower Adjustment
1. Turn the “Monkey” switch off
2. Turn power on
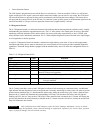
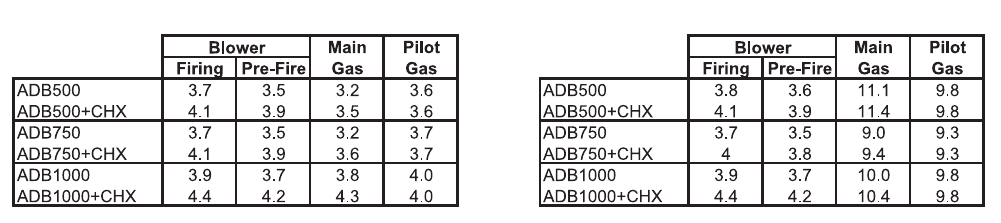
3. Check blower manometer reading, Location (4). Compare your reading to the values shown in tables O-2 for natural
gas and O-3 for propane, for the appropriate size unit. The reading should be about 2/10” (0.2”) lower. If not, adjust
the air shutter on the blower to attain the correct value.
4. Turn power off.
3.2 Pilot Adjustment
1. Turn on the gas shut-off valve;
2. Turn "Monkey" switch off. This will allow pilot to light but not main burner;
3. Turn power on, after 40-45 seconds, ignition control will energize and send spark to ignition, observe through view
port for spark;
4. If you do not see spark, turn off power, check ignition wire and proper grounding and wiring. Turn power back on.
Repeat Step 1. If there is still no spark after several attempts the igniter may be misaligned.
5. Check to see if igniter is grounded out by pulling the spark wire and doing a continuity check between the igniter and
burner. If the igniter is grounded out, it must be realigned. Remove the burner. Loosen the igniter nut, locate the igniter
in the center of the burner head and tighten igniter nut. Confirm it is centered and reinstall burner head.
5. If you have spark, turn off unit;
6. Turn on power. Unit will pre-purge 40-45 seconds and to ignition trial. You will hear a click from pilot gas valve
(you will not hear the sparking).
7. The pilot may not light at first trial; leave the unit running until you have pilot. If you still do not see pilot over 90
seconds; turn off the unit; repeat step 6.
8. Check pilot manifold pressure, Location (3). Compare the reading to the values listed in tables O-2 and O-3.
9. Check pilot flame; 8 distinct circular blue flames around the center of the pilot.
10. Replace the cap for pilot manifold adjustment screw.
60
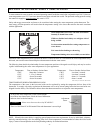
TABLE O-2: PRESSURE SETTINGS FOR NAT. GAS TABLE O-3: PRESSURE SETTINGS FOR PROPANE
Note:For different gas control options, call factory for proper pressure settings (ie; IRI, etc)