


Normal Inspection Procedures
First and third month after initial start up and then on
an annual basis. If problems are found, refer to
Trouble Shooting Guide for additional directions.
1. Remove top of heater and inspect heat exchanger
for soot and examine venting system.
2. Remove rear header and inspect for scale
deposits.
*3. Inspect pilot and main burner flame and firing rate.
*4. Inspect and operate all controls and gas valve.
*5. Visually inspect system for water leaks.
*6. a. Oil pump motor and bearing assembly, if oil
cups are provided.
b. Disconnect pump from header and check con-
dition of pump impeller. Check condition of
bearing by attempting to move impeller from
side to side. Replace any parts showing wear.
c. Check pump coupler for wear and vibration.
7. Check flow switch paddle (if provided).
8. Clean room air intake openings to assure ade-
quate flow of combustion and ventilation air.
9. Keep heater area clear and free from combustible
materials, gasoline, and other flammable vapors
and liquids.
*Should be checked monthly. (Takes approximately 15
minutes).
21
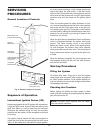
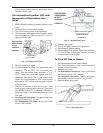
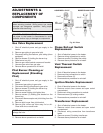
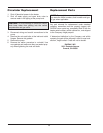
Fig. 16: Typical Main Burner Flame
Fig. 17: Pilot Burner Flame (STG Pilot Units)
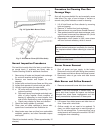
Procedure for Cleaning Flue Gas
Passage Ways
Soot will clog areas behind fins and eventually cause
tube failure. Any sign of soot at base of burners or
around outer jacket indicates a need for cleaning.
1. Lift off draft hood and flue collector by removing
bolts and screws.
2. Remove "V" baffles from heat exchanger.
3. Remove burner tray, see Burner Drawer Removal.
4. Take garden hose and wash heat exchanger, mak-
ing sure soot is removed from between fins. (Avoid
excessive water against refractory).
5. Reassemble; when heater is fired, some steam
will form from wet refractory, which is normal.
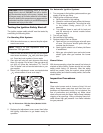
Burner Drawer Removal
1. Shut off power and gas supply to the heater.
Disconnect union(s) and pilot tubing when present;
then loosen and remove burner hold down screws.
2. Disconnect wires at gas valve and slide burner
drawer out.
Main Burner and Orifice Removal
1. Remove screws and burner hold down bracket.
2. Lift burners from slotted spacer and slide from ori-
fices. Clean with a wire brush.
3. Orifices usually do not need to be replaced. To
clean, run either copper wire or wood through ori-
fice. Do not enlarge hole. To remove orifice, use a
socket wrench and remove the manifold. DO NOT
overtighten when reinstalling.
NOTE: In extreme cases it may be necessary to
remove the heat exchanger completely for cleaning.
The simplest method is steam cleaning at a local car
wash.
CAUTION: Soot is combustible. Exercise extreme
care. Do not wire brush.
NOTE: If the heat exchanger is sooted badly, the
burner hold down bracket and spacer can become
distorted from direct flame impingement and this
usually necessitates replacement of these parts.