


- 5 -
Step 2
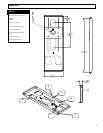
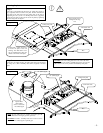
Cut a hole on the marked tile where the 1½" (NPT) close nipple or
pipe (optional) will be secured to the plate. Position and slide the
stud plate to the hole and secure the ceiling plate to the rails by
tightening the four (4) M5 x 16 Phillips head screws (supplied).
Center the stud plate to the hole and secure the plate by tightening
the four win
g
nuts. See fi
g
ure 2
Securing the plate
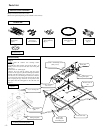
Step 3
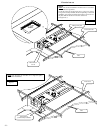
Secure the 1½" (NPT) nipple to the ceiling plate and secure the nipple
by using one (1) M5 x 16 Phillips head screw (supplied) to the stud
plate.
Tiles
T-bar frame rails
Align with the cut out
and tighten the wing
nuts
Tighten M5 x 16mm Set Screw
to secure the plate to the rail
framing. The M5x16mm screw
may be installed from either the
outside or the inside of the plate.
Ceiling main plate
Ceiling main plate
Tiles
1½" (NPT) nipple
Tighten M5 x
16mm Safety
Screw to secure the
1½" (NPT) nipple
1½" (NPT) nipple
T-bar frame rails
CAUTION: The main ceiling plate has to rest on the t-bar main
frame. Use the four (4) M5 x 16 Phillip head screws to secure the
plate. Failure to do so may result in the instability of the plate.
NOTE: If more ceiling drop is required, use longer pipe call
Premier Mounts Inc For longer pipe size (optional).
CAUTION
: The M5 x 16 Phillip head screw must be used to
stabilize the 1½" (NPT) nipple or optional pipe.
Figure 2
Figure 3