CAUTION
Read Rules for Safe Operation and Instructions Carefully.
WARNING
1. To reduce the risk of fire or electric shock, do not use this fan with any solid-state speed control device.
2. This appliance has a polarized plug (one blade is wider than the other). To reduce the risk of electric shock,
this plug is intended to fit in a polarized outlet only one way. If plug does not fit fully in the outlet, reverse plug.
If it still does not fit, contact a qualified electrician. Do not attempt to defeat this safety feature.
3. Do not leave the fan running unattended.
RULES FOR SAFE OPERATION
1. Never insert fingers, pencils, or any other object through the grill when fan is running.
2. Disconnect fan when moving from one location to another.
3. Disconnect fan when removing grills for cleaning.
4. Be sure fan is on a stable surface when operating to avoid overturning.
5. DO NOT use fan in window. Rain may create electrical hazard.
ASSEMBLY OF BLADE AND GRILLS
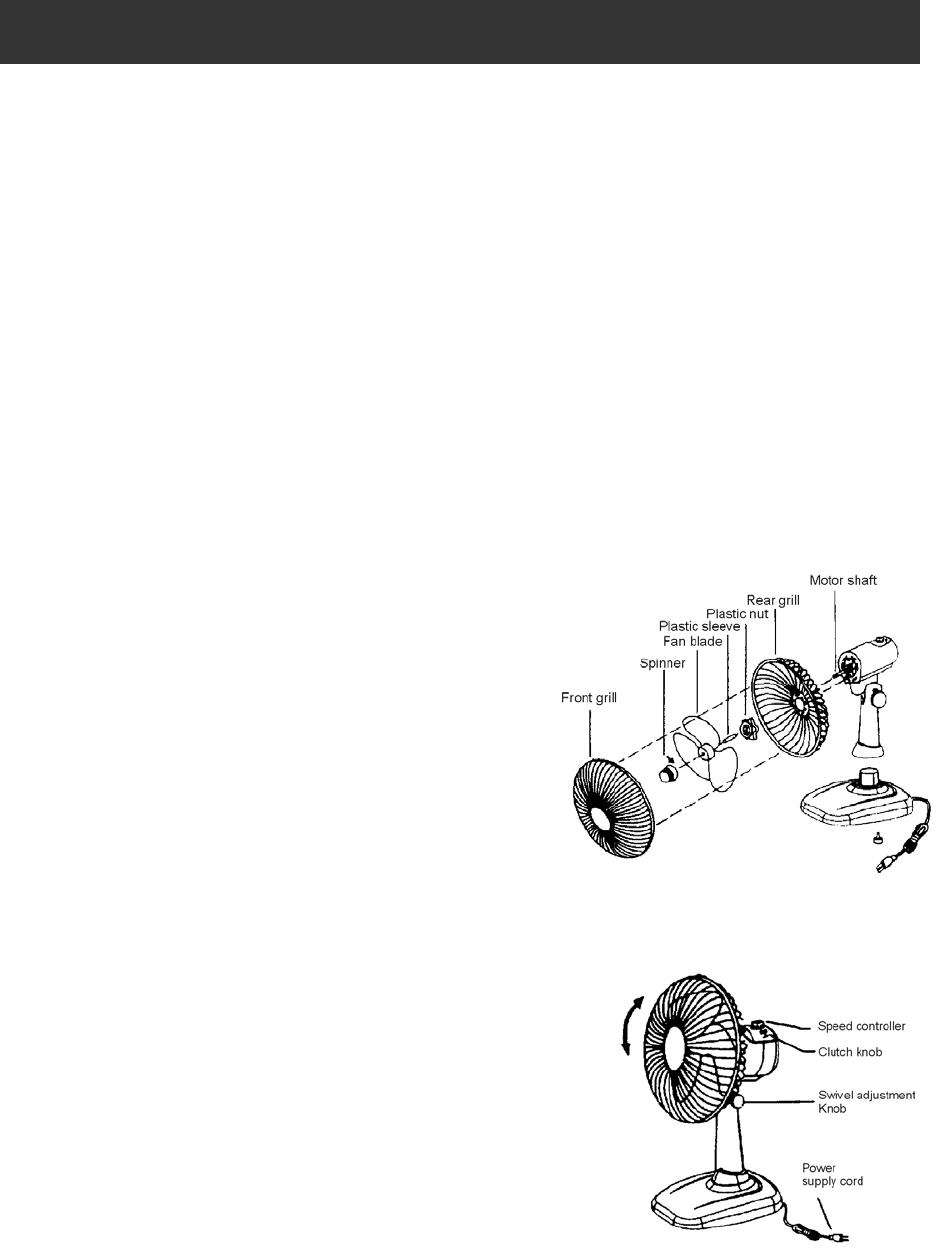
1. Unscrew the spinner clockwise and the nut counter-clockwise
then remove both of them.
2. Set the rear grill in the proper position with handle up.
3. Screw on plastic nut tightly to attach rear grill.
4. Discard plastic sleeve on motor shaft.
5. Install the blade onto the motor shaft until it reaches the
retaining pin.
6. Screw spinner on to motor shaft counter-clockwise.
7. Mount the front grill with the trademark placed in the proper
direction, the fix front grill and rear grill together with clips.
ASSEMBLY OF FAN PEDESTAL ONTO FAN BASE
1. Detach screw from base of the fan.
2. Match locking lug to base.
3. Tighten the screw from the base to lock the fan and base.
OPERATING INSTRUCTIONS
1. Plug the power supply cord into a wall outlet.
2. Speed controller is on the back of motor.
3. To make/stop the fan head oscillate, push down/pull the clutch knob.
4. To adjust the airflow upward or mild downward, simply loosen the
Swivel Adjustment Knob and move to desired angle then firmly
tighten the Swivel Adjustment Knob.
CLEANING
1. Be sure to unplug from the electrical supply source before cleaning.
2.
Plastic parts should be cleaned with mild soap and a damp cloth or sponge. Thoroughly to remove soap film


