


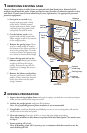
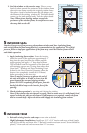
A. Score paint or varnish along
interior sash stops with a sharp
utility knife. Carefully remove
INTERIORSASHSTOPSATJAMBSSIDES
ANDHEADTOPUSINGPUTTYKNIFE
and prybar. Set aside to reuse.
B. Cut the balance cords on the
bottom sash and lift out the sash.
Allow weights to fall to the bottom
of the weight pocket.
C. Remove the parting stops. There
may be a small wedge of wood at
the bottom of the upper sash that is
NEXTTOTHEPARTINGSTOPS4OMAKE
it easier to remove the parting stop,
use a chisel to knock off the wedge.
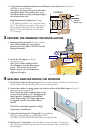
D. Lower the top sash and cut the
balance cords allowing the balance
weights to fall into the weight
pocket. Remove the top sash. Be
CAREFULNOTTODAMAGETHEEXTERIOR
blind stop.
E. Remove the balance cord pulleys.
Unscrew and remove balance cord
pulleys. If they cannot be removed
easily, drive them into the jamb
using a hammer.
1 REMOVING EXISTING SASH
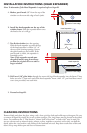
Caution: Many windows in older homes are painted with lead-based paint. Removal of old
windows may disturb this paint. Proper precautions must be taken to minimize exposure to dust
and debris. Consult state or local authorities for more information. Use appropriate personal
protective equipment.
A. Inspect the existing window frame and repair or replace any defective or rotted wood parts.
-AKESURETHEEXTERIORBLINDSTOPSARESOUND
B. Insulate the weight pocket with loose fill insulation.
Note: Use of expanding/aerosol foam insulation is not recommended.
C. If applicable,INSTALLPRElNISHEDMETALmASHINGORTRIMTOCOVEREXISTINGFRAMESILLANDTHE
EXTERIORTRIMATTHEHEADANDJAMBS
D. Clean the openingOFANYDIRTDEBRISOREXCESSOLDPAINTBEFOREPROCEEDING
Note: Many windows in older homes are painted with lead-based paint. See caution note
in Step 1.
2 OPENING PREPARATION
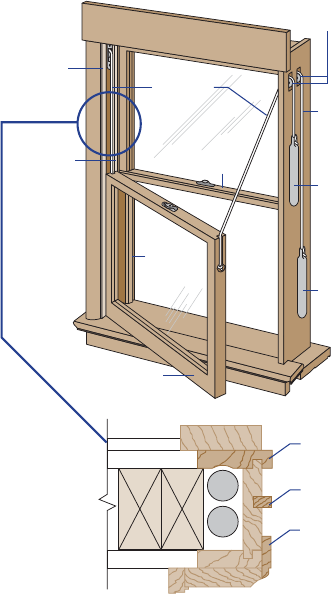
*OUFSJPS
TBTITUPQ
&YUFSJPS
CMJOE
TUPQ
1BSUJOH
TUPQ
#PUUPN
TBTI
5PQTBTI
#PUUPN
TBTI
XFJHIU
5PQ
CBMBODF
DPSE
#BMBODF
DPSEQVMMFZT
5PQTBTI
XFJHIU
#PUUPN
CBMBODF
DPSET
*/5&3*03
*OUFSJPS
TBTITUPQ
1BSUJOHTUPQ
&YUFSJPS
CMJOETUPQ
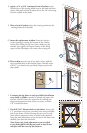
E. Ensure existing sill is level.
Note: If shimming of the sill is necessary, use a continuous shim that extends across the
entire width of the sill.