


2
PREPARE THE OPENING (CONTINUED)
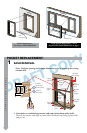
POCKET REPLACEMENT
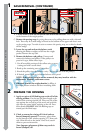
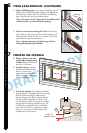
D. Test t the window. e window should be
approximately 1/2” smaller than the opening
in both width and height. Measure the distance
between the frame and the sloped sill, this will
be the height to which to cut the sill adapter.
Check to ensure the window rests against the
exterior blind stops and will make contact with
the sealant to be applied in steps 3 A, B, and C.
Conrm the installation screws will fasten into
solid wood. If not, repair the existing frame to
ensure there is solid wood at the installation
screw locations.
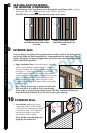
E. Trim the sill adapter to the proper
height by breaking o the grooved leg at
the desired dimension (see chart). Once
trimmed, apply a bead of sealant to the sill
adapter. Attach the sill adapter into the sill
by using a board and hammer.
Note: Scoring the leg groove multiple times
at the desired dimension with a utility
knife will help the leg break easier. e sill
adapter may also be trimmed to correct
dimension using a table saw.
3
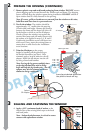
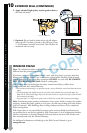
SEALING AND FASTENING THE WINDOW
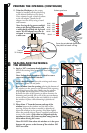
A. Apply a 3/8" continuous bead of sealant to the
interior face of the existing blind stops at the head
and both jambs.
Note: Sealant bead placement is critical to ensure
contact with replacement window
3A
Jamb
blind
stop
Head blind
stop
5/16” - 3/8”
7/16” - 1/2”
9/16” - 5/8”
11/16” - 3/4”
13/16” - 7/8”
15/16” - 1”
Sealant goes here
Score leg at desired dimension.
Use pliers to break off leg.
2E
Sill Adapter
2D
2E
Sill Adapter
Sealant
2E
C. Remove plastic wrap and card board packaging from window. DO NOT remove
plastic shipping spacers located between the window sash and frame. e shipping
spacers will help keep the window square during installation. DO NOT unlock or
open window until it is fully fastened in the opening.
Note: If screens, grilles or hardware are removed from the window at this time,
label them and store them in a protected area.