


4 C3438M (5/07)
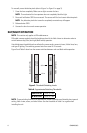
SWITCH SETTINGS
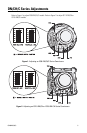
Locate the DIP switch. Then set the switches for your installation.
SW4-1: AGC (Auto Gain Control)
The AGC (automatic gain control) adjusts the image automatically to compensate for changes in light
levels.
Set to ON to enable AGC. Set to OFF to disable AGC. The default is ON.
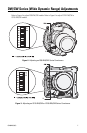
SW4-2: BLC (Backlight Compensation)
The BLC (backlight compensation) feature compensates for backlit scenes by enhancing objects in the
center of the scene.
Set to ON to enable BLC. Use this setting if a bright backlight is present and the subject in the center
of the picture appears dark or as a silhouette.
Set to OFF to disable backlight compensation. This is the default.
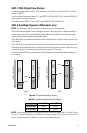
SW4-3: Line Sync
When multiple cameras are connected to the same switching device, vertical roll may occur on the
monitor. AC line lock eliminates vertical roll by locking the frame rate to the power supply frequency.
Each camera output is synchronized to the power supply frequency. (Refer to Vertical Phase
Adjustment on page 5 for more information.)
Internal line sync disables line lock and synchronizes cameras internally.
Set to OFF to use AC line lock. Set to ON to use internal line sync. The default is OFF.
SW4-4: Flickerless
In certain lighting conditions, a flicker in the light source may affect camera operation. Flickering can
be caused by a number of conditions, including the quality of the source power and the age and type
of fluorescent bulbs and ballasts.
Set to ON to enable flickerless operation. The camera will remove the effects of flickering when
present. The shutter speed will be set to 1/120 (NTSC) or 1/100 (PAL).
Set to OFF to disable flickerless operation. This is the default.
NOTE: If you enable flickerless operation, you should use AC line lock for best results.
SW4-5: AWB (Auto White Balance)/MWB (Manual White Balance)
Auto white balance is enabled by default (OFF).
To manually set and lock the white balance:
1. Set SW4-5 to OFF.
2. Hold a white background in front of the lens until the video shows all white.
3. While holding the background in place, set SW4-5 to ON. A blue blinking block appears on the
video image for a few seconds. When the block changes to solid green, the manual white
balance process is complete.
SW4-6: Reserved
Do not change SW4-6 from its factory setting. SW4-6 must be set to OFF for Varifocal models; it must
be set to ON for fixed-iris lenses.