


Pelco Manual C1422M-D (8/05) 7
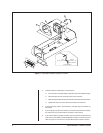
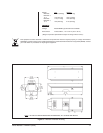
9. Wire power from the circuit board to the camera (refer to Figure 2).
There are two ways to supply power to the camera: when the power require-
ments for the camera and enclosure’s accessories are the same (for example,
if the camera and accessories use 24 VAC), and when the power require-
ments for the camera and the enclosure’s accessories are different (for ex-
ample, if the camera uses 24 VAC and the accessories use 120 VAC).
When the power requirements are the same:
There are two ways to connect power:
a. A three-pin plug is supplied as loose equipment. Connect the wires from
the plug to the camera as follows:
Brown - AC HI
Blue - AC NT
Green - Ground
Remove the plastic cover over the power supply section of the circuit
board.
Connect the plug to the CAM 1 socket on the circuit board.
Replace the plastic cover.
or
b. If both the camera and enclosure use 120 VAC and you ordered the
optional 120 VAC electrical outlet accessory (O/l OUTLET), connect the
120 VAC plug to the camera. Connect the three-pin plug to CAM 1 (remove
the plastic cover over the circuit board and replace the cover after you
plug in the connector).
When the power requirements are different:
A two-pin plug is supplied as loose equipment. Connect the wires from the
plug to the camera as follows:
Brown - AC Hl
Blue - AC NT
Connect the plug to the CAM 2 socket on the circuit board.
10. Adjust the focus and iris on the camera, if necessary.
11. Close the enclosure lid and mount the enclosure to the pan/tilt unit:
a. Lift the enclosure over the pan/tilt unit and carefully lower the enclosure
into the pan/tilt unit to mate the 26-pin RediLINK™ D-type connectors in
the shaft of the pan/tilt unit and on the bottom of the enclosure.
b. Once the connectors are mated, apply firm pressure downward and to
the back of the enclosure to fully seat the enclosure in the pan/tilt unit.
c. Slowly remove your hands from the enclosure, making sure that the en-
closure is balanced on the pan/tilt unit.
d. With the 5/32 Allen wrench that is supplied with the enclosure, tighten
the two set screws on the back of the enclosure where it mounts to the
pan/tilt unit.
If your camera will use the same
power as the enclosure, plug the
camera into the CAM 1 socket on
the circuit board inside the enclo-
sure.
If your camera’s voltage will be dif-
ferent from the enclosure’s voltage,
plug the camera into the CAM 2
socket only.
DO NOT
plug the
camera into the CAM 1 socket or
you can damage your camera.
CAM 1 has enclosure voltage on
it.
BE CAREFUL - REMEMBER
CAM 1 IS ENCLOSURE
POWER
NEVER PLUG YOUR
CAMERA INTO CAM 1 IF
THE CAMERA’S VOLTAGE
IS DIFFERENT FROM THE
ENCLOSURE’S VOLTAGE.
WARNING:
Camera
damage possible.
You
can damage your camera
if you connect it to the
wrong connector.
WARNING:
Failure to
tighten the screws may
result in damage to the
enclosure when you op-
erate the camera.