


Pelco Manual C1446M-B (7/98) 5
3.0 INSTALLATION
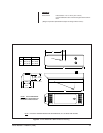
3.1 ENCLOSURE MOUNTING
1. Place the enclosure on a flat surface with the bottom facing up. Open the door.
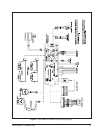
2. Remove the camera sled from the rail (refer to Figure 1 for the location of the
camera sled):
a. Loosen the screws.
b. Slide the sled so that the screws are in the large part of the mounting
holes.
c. Remove the sled.
d. Remove the parts tied to the sled.
3. If you are going to wire the enclosure with cable, remove the wiring glands and
nuts from the parts bag and install them in the top of the enclosure.
If you are going to wire the enclosure using conduit, you do not need the
wiring glands and nuts. Install the conduit in the top of the enclosure. If the
enclosure is installed outdoors, make sure the conduit is sealed to prevent
water from getting inside.
4. There are two threaded mounting holes on the top of the enclosure. Mount the
enclosure to a pan/tilt assembly or fixed mount with 1/4-20 screws with threads
that do not exceed 5/8 of an inch (1.59 cm) in length (not supplied with the
enclosure).
Proceed to Section 3.2, MARINE OR HIGH-MOISTURE ENVIRONMENT.
3.2 MARINE OR HIGH-MOISTURE ENVIRONMENT
(EH4718DB SERIES ONLY)
To install the enclosure in a marine or high-moisture environment, make the follow-
ing modifications to the enclosure (refer to Figure 1):
1. Remove two screws that attach the enclosure lid to the rear plate of the enclo-
sure body and carefully open the enclosure lid a few inches.
2. Remove the plastic barrier cover over the power supply section of the
circuit board.
3. Disconnect two electrical connectors from the circuit board and open the en-
closure lid completely.
4. Remove the four screws and washers that attach the fan to the rear plate of
the enclosure body.
5. Turn the fan around so that it blows toward the viewing window (refer to the
arrows on the fan).
6. Reattach the fan to the rear plate of the enclosure body.
7. Reconnect the electrical connectors to the circuit board.
8. Reinstall the plastic barrier cover over the power supply section of the
circuit board.
9. Close the enclosure lid and reattach it to the rear plate of the enclosure body
with two screws.
CAUTION:
When
opening the enclosure
lid, be careful not to
stress or otherwise
damage the electrical
wires or connectors
inside the enclosure
before disconnecting
them.