Pelco Manual C1441M-D (1/98) 7
3.1.5 V-Phase (Vertical Phase)
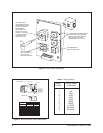
V-Phase (Vertical Phase) is valuable when multiple optic packages are switched by
a sequential or matrix switcher. The vertical phase +/- buttons are used to compen-
sate for vertical phase discrepancies which will occur in a multiple camera environ-
ment. In this type of environment, each cameras output is synchronized by the
frequency of the power supply and phase. The “+” and “-” buttons referenced in
Figure 2 can be used to obtain a synchronized picture. The user can adjust them by
placing one person at the optics package location and another at the control room
looking at a monitor viewing switching video signals from the optics packages. The
V-phase adjustment is ±90°. Use the tip of a ballpoint pen or similar instrument to
press these recessed buttons. The phase change is linear. Pressing a button will
activate a phase change in the direction indicated. The phase change will begin
after about 1/2 second, but the switch must be held down for a total of 5 or 6 sec-
onds for the phase change to occur. An equal amount of time is required to go in the
opposite direction. Each optics package should be adjusted so that as the switch-
ers switch from one optics package to the next, the monitor does not “roll” or show
partial frames of the video picture.
3.1.6 Auto Iris
As an option, this optics package may have an “active” auto iris lens. An active auto
iris lens is fed back information from the camera imaging head to the auto iris cir-
cuitry of the lens. The lens processes this information and tries to maintain a con-
stant light level to the image head at all times. The auto iris lens has two (2) controls
which may be field adjusted. These controls are “LEVEL” and “ALC”. From the fac-
tory, the optics package is set to handle a general wide range of lighting conditions.
To set the optics package in the field for your specific lighting condition, you must
first determine if the picture on the viewing monitor is too bright or too dim. Before
adjusting the Iris controls, the monitor controls must be set at their “detente” (or
notched) factory recommended positions (not having all controls for contrast, pic-
ture, color, tint, etc. adjusted for maximum intensity). If a very dim picture is present,
this would indicate that the iris could be opened a little more to allow additional light
to be imposed on the image head. To brighten the picture, the “LEVEL” control
should be rotated clockwise to allow more light to be shown on the image head. If
the picture is too bright, rotating the “LEVEL” control counterclockwise will allow
less light to be shown on the image head and the picture on the monitor will be-
come dimmer. If the installation site has varying light conditions due to storefront
windows, several adjustments may be necessary to ensure adequate overall per-
formance. As an alternate (more objective) method of adjusting the iris, an oscillo-
scope or video meter may be connected to the output of the optics package and the
“LEVEL” control adjusted for a 1 volt peak-to-peak video signal out. Lastly, the “ALC”
control can be adjusted to either Peak or Average sampling levels. Peak levels are
obtained by rotating the “ALC” control clockwise. Counterclockwise rotation of the
“ALC” control results in more average levels. Peak levels may be necessary if you
want to view dark objects in a bright setting. This condition is commonly known as
backlight compensation. Peak settings tend to open the iris a little more and average
levels tend to close the iris a little given the light sampling rate of the lens.


