B. CONTROL DESCRIPTIONS
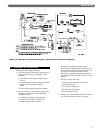
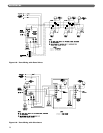
See Figure 6.1 in Section 6 (Electrical) for locations of
these devices.
1. FLAME ROLL-OUT SAFETY SHUT-OFF SWITCH
(FLAME ROLL-OUT SWITCH) – A thermally
activated switch located between the first burner
from the left and the manifold bracket. The flame
roll-out safety shut-off switch will sense excessive
temperature caused by continued flame roll-out and
shut down main burner gas. This is a non-recycling
switch that must be replaced once it has been
activated and the cause of the roll-out eliminated.
2. VENT SAFETY SHUT-OFF SWITCH (SPILL
SWITCH) – A thermally activated, manually
resetable switch located in the draft hood relief
opening. If venting system becomes partially or
totally blocked, the vent safety shut-off switch will
sense excessive temperature caused by flue products
exiting the draft hood relief opening and shut down
main burner gas.
3. LIMIT (AQUASTAT) – A thermally activated,
manually adjustable switch located on the left side of
the boiler, towards the top and rear. The temperature
sensing element is placed in the supply and will shut
down main burner gas if the supply water exceeds
the preset temperature limit. This is a recycling
switch that will automatically reset when the supply
water falls below the preset temperature.
4. LOW WATER CUT-OFF (FOR GRAVITY SYSTEMS
OR HOT WATER BOILERS INSTALLED ABOVE
RADIATION LEVEL) – A level-sensing device (float
or probe) located in supply piping near the boiler. If
water level in the system drops below the control’s
position, it will shut down main burner gas. The
control will automatically reset once the water level
rises above its position.
C. ADJUSTMENT OF GAS PRESSURE
REGULATOR
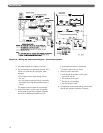
1. Using the manometer setup installed in part 7A, set
manifold pressure as follows for various gases.
a. Natural Gas . . .3.5″ Water Column (0.9 kPa)
b. LP Gas . . . . .10.0″ Water Column (2.5 kPa)
2. To adjust gas pressure, turn adjusting screw of gas
pressure regulator counterclockwise to decrease
pressure, clockwise to increase pressure. Refer to
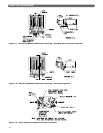
Figure 7.3 for location of gas pressure regulator.
Replace the cap screw when adjustment is complete.
3. In no case should the final manifold pressure vary
more than ±0.3 inches water column (0.07 kPa)
from the above specified pressures. Any necessary
major changes in the flow should be made by
changing the size of the burner orifice spuds.
4. When adjustment is complete, turn off boiler, gas
flow and electricity to boiler. Remove manometer
connection from valve and plug tapping with plug
provided. Turn utilities back on and resume
checkout.
GAS FLOW
D. ADJUSTMENT OF PILOT GAS FLOW
To maximize thermocouple life, particularly on natural
gas installations with gas supply pressures above 9″ W.C.
(2.2 kPa), reduce the pilot gas flow.
1. Locate and remove the pilot adjustment cap screw
using Figure 7.3.
2. Remove pilot observation port cover on base front
panel.
3. Turn the pilot adjustment screw clockwise until the
pilot flame extinguishes. Then increase the pilot flow
just to the point that the gas valve holds in when
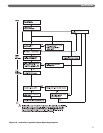
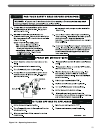
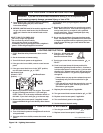
relighting the pilot per steps 9 and 10 of Lighting
Instructions in Figure 7.5 (turn screw no more than
an 1/8 turn).
4. Turn on electric power to the appliance.
5. Turn Gas Control Knob to “On” position per the
Lighting Instructions in Figure 7.5.
6. Verify pilot remains lit after shutdown from a boiler
“ON” cycle of at least ten minutes. If pilot
extinguishes, follow Lighting Instructions in Figure
7.5 and again slightly increase pilot flow.
7. Make a final slight increase in the size of the pilot to
ensure sufficient pilot signal under all operating
conditions, just to the point that you observe a slight
increase in the size of the flame (no more than an
1/8 turn).
8. Replace adjustment cap screw and observation port
cover.
25
START-UP PROCEDURES
Turn off all electric power to the appliance.
Turn Gas Control Knob to “Pilot” position as shown
in Figure 7.3.
WARNING
The first few turns of the adjustment screw may not
cause any change in the pilot flow. Subsequent
partial turns of the adjustment screw may have a
great impact on pilot flow.
NOTICE


