


7
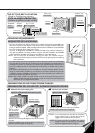
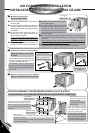
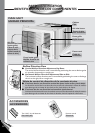
• Hot sun rays hitting the outside surface of the cabinet will create considerable heat
load. If the outside of the cabinet is exposed to direct sunlight, consider building an
awning to shade the cabinet while providing ample area for the heated air to be exhausted
from the condenser (both sides) and the top.
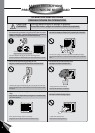
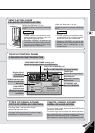
This unit is designed for installation in standard double hung windows. However, it
may also be installed in a sliding window using the optional installation kit (ME-68S
and CZ-MW4-P) available through your local dealer or parts distributor.
NOTE: The unit may also be installed “through the wall”. You should, however,
observe standard carpentry practices and frame the opening without violating
local ordinances.
• Los rayos solares que tocan la superficie exterior de la caja crearán una considerable
carga de calor. Si la parte que da al exterior de la caja está bajo la luz directa del sol,
considere el construir un toldo para dar sombra pero dejando espacio suficiente para
que el aire caliente pueda ser expulsado del condensador (en ambos lados) y parte
superior.
Este aparato está diseñado para ser instalado en ventanas levadizas dobles. Sin em-
bargo, se pueda instalar también en una ventana de corredora utilizando los avíos de
instalación optativos (ME-68S y CZ-MW4-P) que están disponibles por medio de su
comerciante local o distribuidor de partes.
NOTA: Esta unidad tambíen se puede instalar a través de la pared. En este caso, se
deberán realizar trabajos de carpintería y construir una estructura en la abertura
deacuerdo con los reglamentos locales.
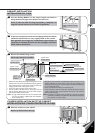
WINDOW REQUIREMENTS
REQUISITOS DE LA VENTANA
21-
21
/
32
to 35-
7
/
16
21-
21
/
32
a 35-
7
/
16
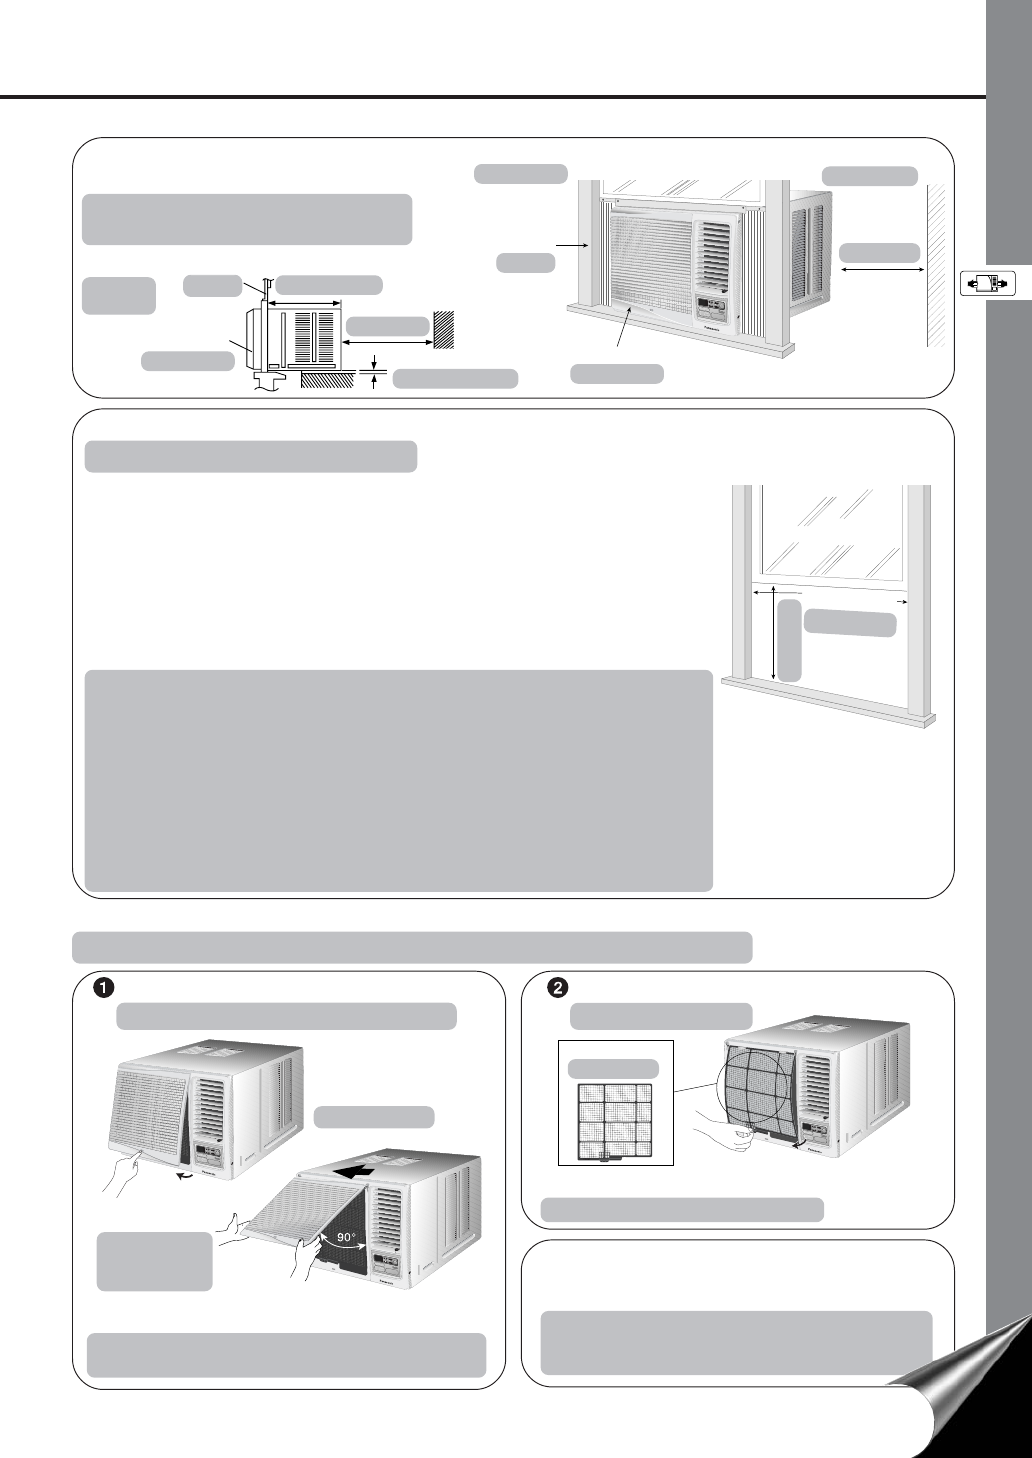
PREPARATION OF AIR CONDITIONER CHASSIS
PREPARACIÓN DEL CHASIS DEL ACONDICIONADOR DE AIRE
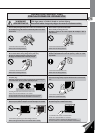
Remove the front intake grille
Quite la rejilla frontal de la toma de aire
Push and release.
Presione y suelte.
C
L
O
S
E
V
E
N
T
O
P
E
N
O
F
F
/
O
N
O
P
E
R
A
T
I
O
N
T
E
M
P
/
T
I
M
E
R
C
O
O
L
F
A
N
H
I
G
H
M
E
D
L
O
W
M
O
D
E
F
A
N
S
P
E
E
D
S
E
T
T
I
M
E
R
S
E
T
/
C
A
N
C
E
L
h
r
F
E
C
O
N
O
M
Y
W
i
r
e
l
e
s
s
R
e
m
o
t
e
C
o
n
t
r
o
l
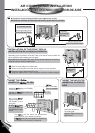
Slide the front intake grille slightly to the left to unhook
the tabs.
Deslice la rejilla frontal de toma de aire un poco a la
izquierda para descolgar las lengüetas.
Lift up to about
90° and remove.
Levante hasta
más o menos 90˚
y quite.
C
L
O
S
E
V
E
N
T
O
P
E
N
O
F
F
/
O
N
OPERATION
T
E
M
P
/
T
I
M
E
R
C
O
O
L
F
A
N
H
I
G
H
M
E
D
L
O
W
M
O
D
E
F
A
N
S
P
E
E
D
S
E
T
T
I
M
E
R
S
E
T
/
C
A
N
C
E
L
h
r
F
ECONOMY
W
i
r
e
l
e
s
s
R
e
m
o
t
e
C
o
n
t
r
o
l
Remove the air filter
Quite el filtro de aire
C
L
O
S
E
V
E
N
T
O
P
E
N
O
F
F
/
O
N
O
P
E
R
A
T
IO
N
T
E
M
P
/
T
I
M
E
R
C
O
O
L
FA
N
H
I
G
H
M
E
D
L
O
W
M
OD
E
FA
N
S
P
E
E
D
S
E
T
T
I
M
E
R
S
E
T
/
C
A
N
CE
L
h
r
F
E
C
O
N
O
M
Y
W
i
r
e
l
e
s
s
R
e
m
o
t
e
C
o
n
t
r
o
l
Air filter
Filtro de aire
Tilt up and pull out the air filter by the holder.
Incline y saque el filtro por el soporte.
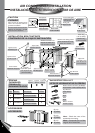
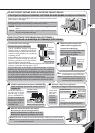
SELECT THE BEST LOCATION
(Single or Double hung window)
ELIJA LA MEJOR UBICACIÓN
(Ventana de guillotina simple o doble)
Front grille
Rejilla frontal
Indoor side
Lado interior
18–
11
/
16
inches
18–
11
/
16
pulgadas
O
F
F
/
O
N
O
P
E
R
A
T
I
O
N
T
E
M
P
/
T
I
M
E
R
C
O
O
L
F
A
N
H
I
G
H
M
E
D
L
O
W
M
O
D
E
F
A
N
S
P
E
E
D
S
E
T
T
I
M
E
R
S
E
T
/
C
A
N
C
E
L
h
r
F
E
C
O
N
O
M
Y
W
i
r
e
l
e
s
s
R
e
m
o
t
e
C
o
n
t
r
o
l
Window
Ventana
SIDE VIEW
VISTA
LATERAL
Front grille
Rejilla frontal
Window
Ventana
Outdoor side
Lado exterior
12 inches
12 pulgadas
12 inches
12 pulgadas
More than 4 inches
Más de 4 pulgadas
NOTE: It is much easier, and also safer, to install the
empty cabinet into a window first and we
suggest that you follow this procedure.
NOTA: Es mucho más fácil y también más seguro
instalar primero la caja vacía en la ventana.
Nosotros sugerimos, que lo haga así.
14 -
1
/
4
(min)
14 -
1
/
4
(minimo)
7