


5
ENGLISH
CAUTION—Wood Floors, Soft (Vinyl, Asphalt Tile, etc.) Floor
Surfaces and Polished Floor Finishes
Use floor and floor finish manufacturer’s recommended methods of
cleaning. The metal strip on the base of the cleaner could be damaged
if used on concrete or abrasive surfaces, and, therefore, cause damage
to wood floors, soft (vinyl, asphalt tile, etc.) floor surfaces and polished
floor finishes. The roller brush may also scuff very soft finishes. Do not
operate the unit while in the upright and locked position. Do not let the
unit run while in any one stationary position for any period of time. Keep
the unit moving while in operation.
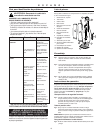
XL3600HH: Celoc
®
Hypo-Allergenic Filter System
The Celoc SMMS outer bag of your vacuum cleaner is high filtration
medical material designed to filter the smallest of dust particles. It is
important the inside of the outer bag be cleaned. Vacuum the inside of
the outer bag or hand wash, turned inside out, with warm water, and air
dry. For best results, the Celoc SMMS outer bag should be replaced
once a year. The Celoc layered disposable inner dust bag must be
replaced once a month even if it is not full. Change it more often if it is
used in extremely dirty areas. Increase the cleaning power of your
vacuum by changing the bag often.
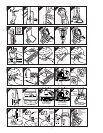
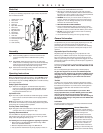
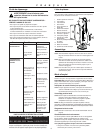
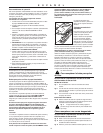
To Replace Filter Dust Bag
WARNING: Unplug cord from electrical
outlet before servicing.
BAG REMOVAL:
fig. 7
Unzip outer bag completely.
fig. 8 Pull bag cardboard collar to release bag dock door from
connector. Bag dock door will hinge downward.
fig. 9 Gently pull bag cardboard collar upward out of the bag dock.
The dust seal will close automatically.
BAG INSTALLATION:
fig. 10
Slide the cardboard collar completely onto bag dock door.
fig. 11 Firmly push bag dock door with both thumbs on indication point
until it snaps.
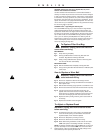
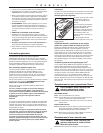
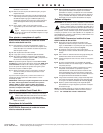
How to Replace a Worn Belt
WARNING: Unplug cord from electrical
outlet before servicing.
fig. 12 Remove the replacement belt from the storage channel.
fig. 13 Remove the door by removing the hold down screw located on
side of power head.
fig. 14 Slide the door forward by prying open with a screwdriver or coin.
fig. 15 Remove the belt from the motor drive shaft and brush roll pulley.
fig. 16 Loop the new belt over the motor drive shaft. Place the
opposite end of the belt on the brush roll pulley. Rotate the
brush roll three (3) complete revolutions to ensure that no part
of the belt is overhanging the end of the motor drive shaft.
fig. 14 Replace the door by sliding it into the groove at the bottom of
the housing.
fig. 13 Replace the hold down screw and tighten.
To Adjust or Replace Brush
WARNING: Unplug cord from electrical outlet
before servicing.
fig. 17 To determine if the brush is worn, place a firm straight edge
across the nozzle opening. If brush bristles do not extend
beyond baseplate, brush should be adjusted.
fig. 18 Remove the baseplate by removing 5 screws.
fig. 19 Remove the belt and brush roll from the housing.
fig. 20 Rotate both bearing assemblies at ends of brush roll to show
"OLD" and replace in the holding channels in the housing.
NOTE: The bearing assembly setting marked "OLD" has no ribs on the
top of the assembly. The one marked "NEW" has several ribs. When
rotating bearings, make sure both bearing assembly settings are the
same and face up when replacing the brush roll.