


Sample Cleaning Procedures:
You can use the Oreck Steemer cleaner in many ways to achieve
optimal results. The following chart is a guide to usage, however, feel
free to use it in a manner which you think is most effective depending on
the surface.
The procedure section indicates the types of passes to use on the
flooring. For example “Shampoo-Dry-Rinse-Dry” means, one shampoo
pass, then one dry pass, one rinse pass (water only), then one dry pass.
Carpet Cleaning
Situation Procedure
Monthly Maintenance Cleaning - Quick Shampoo - Dry
Monthly Maintenance Cleaning - Standard Pre-treat with “Spot & Stain
Remover” as necessary.
Shampoo-Dry-Rinse-Dry
Monthly Maintenance Cleaning - Thorough Pre-treat with “Spot & Stain
Remover”
Shampoo-Dry-Rinse-Dry
Rinse-Dry
●
Thicker Carpet Pre-treat with “Spot & Stain
●
Heavy Duty Cleaning Remover”
●
Traffic Lanes Shampoo-Dry-Rinse-Dry
●
Spots Rinse-Dry
Hard Floor Cleaning
Situation Procedure
Quick Clean Shampoo-Dry
Standard Clean Pre-treat with “Spot & Stain
Remover” as necessary.
Shampoo-Dry-Rinse-Dry
Heavy Duty Clean Pre-treat with “Spot & Stain
Remover”
Shampoo-Dry-Rinse-Dry
Rinse-Dry
NOTE: Additional drying passes can be used to reduce carpet and
hard floor moisture and shorten drying time.
For Above the Floor Cleaning - Cars, Stairs, Etc.:
CAUTION: Set the button in the handle to the floor (back)
position when using the hand held nozzle for extraction only.
Unplug the cleaner from the electrical outlet.
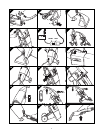
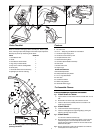
fig. 4 You will first need to unplug the separate power nozzle cord that
connects the Steemer nozzle to the cleaner.
fig. 3 Remove the nozzle by depressing the button located on the side
of the neck. Pull the nozzle straight back and off the neck without
twisting.
fig. 17 Lower cleaner onto floor stand.
fig. 7/8 Remove the supply/recovery tank from the cleaner.
fig. 9 Open tank cap. Fill with hot tap water, close tank cap.
fig. 10 Replace tank onto cleaner.
fig. 16 Attach the hand-held nozzle and hose assembly to the cleaner
neck. Align the guide tab on top of unit’s neck with slot in hose
collar. Depress the button and push the hose collar onto the unit
until the button locks securely in the collar hole.
fig. 13 Place power switch in the “ON” position.
fig. 14 Press the spray button in the handle and push forward to lock.
fig. 18 Press the cleaner dispensing trigger on the hand-held nozzle to
release cleaner.
To Prepare Upholstery:
IMPORTANT: Prior to cleaning any upholstered furniture, read the
following instructions very carefully.
Most modern upholstery fabrics may be safely cleaned by wet cleaning
methods; yet there are exceptions to this, as some delicate or unusual
fabrics require “dry cleaning.” If you are in doubt about the type of fabric,
we suggest that you check with the manufacturer or dealer where the
furniture was purchased. Most fabrics are wear coded by the
manufacturer which details cleaning methods for a particular fabric. If
necessary, bring in a cushion or arm cover to your dealer.
CAUTION: Do not allow the lower recovery tank to overfill.
Damage to the unit can result. Empty the recovery tank when full
and whenever clean water is added to the upper supply tank.
fig. 7 To empty the recovery tank, simply release the tank latch by
squeezing the latch together.
fig. 8 Lift the tank out and carry it to a sink or drain. Turn the tank
upside down and pour the dirty water out.
fig. 9 Refill the supply tank with clean hot tap water. Replace cleaner
cartridge as needed.
NOTE: Cleaner will not operate without a cleaner cartridge locked
into the docking bay.
For heavily soiled carpets it may be necessary to clean from several
directions to insure that the carpet is thoroughly cleaned.
To Clean Hard Flooring (not Hard Wood):
CAUTION: Do not use steemer on hard wood flooring.
fig. 22Attach squeegee by first inserting one tab on the squeegee end
into the slot on nozzle. Then insert the tab located on other end
of squeegee into the nozzle slot.
To remove squeegee (after use) gently pull the handles located
on each end of the squeegee until it releases.
NOTE: Attach squeegee for hard surface cleaning. For best results
remove squeegee when cleaning carpeted surfaces.
fig. 12 Turn the Shampoo/Rinse switch to the “SHAMPOO” position.
fig. 13 Place power switch in the “ON” position.
fig. 14 Press the spray button in the handle and while lifting the handle
slightly, slowly pull the cleaner backwards. Pressing the spray
button releases the cleaner and water mixture. As you pull the
nozzle over the sprayed floor the nozzle extracts the solution
from the floor and stores the dirty water in the recovery tank.
fig. 15 To move forward, slightly tilt the nozzle off the floor and roll the
cleaner forward. Repeat process working in small overlapping
rows for even cleaning until the entire room has been completed.
WARNING: Do not push forward! Pull the cleaner towards you to
clean.
Push down gently on the handle to lift the nozzle off of the floor to
move forward and reposition the cleaner.
IMPORTANT: Adjust the speed of the cleaning stroke to your floor
conditions. Heavily soiled or stained floors will require slower
strokes. Avoid oversaturation.
To shorten the drying time, go back over the floor pulling slowly
backwards without depressing the button. Repeat this procedure until
you do not see water being pulled through the nozzle.
To Rinse Hard Flooring:
fig. 12 Turn the Shampoo/Rinse switch to the “RINSE” position.
fig. 13 Place power switch in the “ON” position.
fig. 14 To rinse hard flooring, press the spray button in the handle.
Slowly pull the cleaner backwards over already cleaned area.
Pressing the spray button releases clean water. As you pull the
nozzle over the sprayed floor the nozzle extracts any remaining
solution from the floor and stores the extracted water in the
recovery tank.
fig. 15 To move forward, slightly tilt the nozzle off the floor and roll the
cleaner forward. Repeat process working in small overlapping
rows for even cleaning until the entire room has been completed.
CAUTION: Do not allow the lower recovery tank to overfill.
Damage to the unit can result. Empty the recovery tank when
full and whenever clean water is added to the upper supply tank.
fig. 7 To empty the recovery tank, simply release the tank latch by
squeezing the latch together.
fig. 8 Lift the tank out and carry it to a sink or drain. Turn the tank
upside down and pour the dirty water out.
fig. 9 Refill the supply tank with clean hot tap water. Replace cleaner
cartridge as needed.
NOTE: Cleaner will not operate without a cleaner cartridge locked
into the docking bay.
7