


OPERATING INSTRUCTIONS
OPERATING INSTRUCTIONS cont.
PREPARATION FOR USE
WARNING: ALWAYS unplug the appliance prior to any type
of maintenance on the unit. As all the appliances are
thoroughly tested before sale, there may be some residual
water in the boiler.
ASSEMBLY & OPERATION
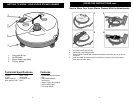
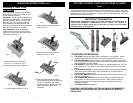
To connect the tube and the accessories (fig. 1), insert part
(A) in part (B) turning this slightly to facilitate insertion. Make
sure that key (C) is securely fastened in the hole provided (D).
Open the reservoir cover (1) and pour in 6.3 cups
(1.5 liters) of tap water or distilled water if your tap water is
particularly hard. Never add cleaning fluids. Close the
reservoir cover (1). Before plugging in the appliance, make
sure that you have assembled the tubes and accessories
correctly and the steam switch on handgrip is “Off”. Press the
on/off switch (2) to “On”; the steam ready light (3) will come
on; when the light (3) switches off (after about 1 minute), you
can start to use the appliance. To spray steam, simply press
the steam switch button on the handle (6) (fig. 2).
ON/OFF STEAM SWITCH
1. Before turning the steam switch to the
“On” position, wait until the “Steam
Ready” light(Red) located on the unit has
turned off.
2. Setting this switch to the “On” position will
start the flow of steam.
CAUTION:
Upon initial use, the steam will be mixed with
water, hot enough to scald. Ensure that the
floor brush is resting on the floor or the hose
handgrip is directed away from user when
steam switch is turned on. Never direct the
nozzle or brush end of the unit toward yourself
or anyone near you.
CAUTION:
The “On/Off Steam Switch” located on the
handle must be in the “Off” position before
attaching or disassembling accessories.
Never leave the “Steam Switch” in the “On”
position when unit is not in use.
When there is no more steam, fill the tank again. To avoid
damage, never use the steam gun without water. If the tank is
full and no steam is sprayed, have the appliance checked by
the manufacturer. Always switch off the appliance after use,
pull out the plug and drain any residual water from water tank.
NOZZLE CLEANING INSTRUCTIONS
Your steamer should not normally require cleaning, however,
should you notice a marked decrease in steam output it may
be necessary to remove mineral deposit build-up from the
nozzle orifice. First ensure that there is water in the tank.
If tank is empty, fill with water, (we recommend using purified
or mineral water), then re-start unit noting whether steam
output is normal. If steam output is still low, follow these cleaning instructions:
1. Unplug steam cleaner from wall outlet.
2. Use a small diameter stiff metal wire such as a straightened metal paperclip
and carefully insert the end of the wire into the nozzle orifice.
3. Move wire back and forth several times to remove any deposits.
4. Reconnect appliance to power outlet, switch on and note steam output.
5. If steam performance does not improve, repeat steps #1 through #4.
5
Important User Information
Please note that this steam cleaner has a “flow through
injection” type boiler and is not a pressurized system. It
will take approximately 45-90 seconds for the steam
injector to heat up and the “steam ready light” to go off.
Once the steam ready light has gone off, push the steam
switch on the handgrip to the “On” position (I) in order to
start the steam flow. Steam power will steadily increase
during the first four (4) minutes of use, after which time
steam output will stabilize. Some steam will condense
around the floor brush when in use and will cause hard
surfaces to become wet during the cleaning process, this
is normal.
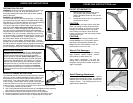
Glass & Tile Squeegee
This attachment is very useful for cleaning
large windows, plastic material, ceramic,
tiled surfaces, marble planes, etc.
Apply steam abundantly, rub with the
spongy side of squeegee and remove with
the glass wiping rubber located at the front
edge of squeegee.
Detail Cleaning Attachment
This attachment is very useful for cleaning
surfaces that are difficult to reach. It is ideal for
radiators, door and window jambs, shutters and
sanitary fixtures. The following parts can be
applied to this attachment:
6