


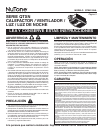

Page 3
MODEL QTXN110HL
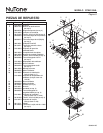
8. Plug-in
light.
Hold grille
assembly up near
housing. Connect
light plug from
grille assembly to
receptacle inside
of housing.
INSTALL GRILLE & BULBS
9. Attach
grille.
Remove the (2)
grille mounting
screws from the
sides of the
housing. (See
Step 8 illustra-
tion.) Use these
screws to attach
the grille to the
housing as
shown.
To avoid damage to the grille: DO NOT OVERTIGHTEN
SCREWS. Tighten screws only until grille is snug against
ceiling material.
10. Install
bulbs.
The unit
accepts (2) 60-
Watt (maxi-
mum) incandes-
cent bulbs and
(1) 7-Watt night
light bulb.
11. Attach
light lens.
Hook the tabs
on one end of
the lens into the
slot in the grille.
Lift other end of
lens up and
snap into place.
GRILLE MOUNTING
SCREWS
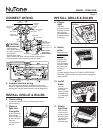
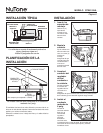
5. Connect electrical wiring.
Run 120 VAC house wiring to installation location. Use
proper UL approved connectors to secure house wiring to
wiring plate. Connect wires as shown in wiring diagram(s).
CONNECT WIRING
INSTALL GRILLE & BULBS
7. Remove
light lens
from grille.
Insert a small flat-
bladed screw-
driver into the slot
at one end of the
light lens.
Carefully pry the
lens out.
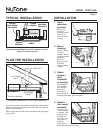
6. Finish ceiling.
Install ceiling material. Cut out ceiling material closely
around housing.
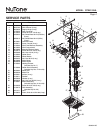
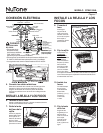
WHITE
to
WHITE
HEAT (2-position rocker)
LIGHT (red)
NIGHT LIGHT (blue)
(3-position rocker)
4-FUNCTION CONTROL
GROUND
120 VAC LINE IN
BLACK to BLUE
BLACK to RED
BLACK to BLACKS
FAN (2-position rocker)
RED
RED
WIRING PLATE
FROM VENTILATOR
VENTILATOR
HOUSING
LIGHT
&
FAN
HEAT
&
NIGHT LIGHT
BLACK to BLUE
(Light)
WHITE to WHITE
RED to RED
(Fan)
RED to BLACK
(Heat)
BLACK to YELLOW
(Night Light)
WHITE to WHITE
CAUTION
RATING SPECIFICATIONS
• The three-position
rocker switch is rated 5 A
@ 125VAC. Use this switch
for Lights ONLY.
• Each two-position rocker
switch is rated 15 A @ 120VAC. Use these switches for Heat and Vent.
• The total load on this control must not exceed 20 A @ 120VAC.
NuTone 4-Function
Control shown
(purchase separately)