20
15. FLUE GAS SAMPLING
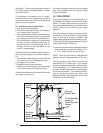
It may be necessary to take flue gas sampling
from oil and gas gun furnaces (M1S and M1B
Series Models) in order to check the perfor-
mance after furnace installation. A flue gas
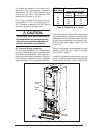
sample may be taken from the heat exchanger,
which is located behind the hole of the top-front
of blower compartment.
1. STOP! Read the SAFETY INFORMATION.
2. Turn off all electric power to the appliance.
3. Remove the black plastic cap located above
the blower and save.
4. Through the top of the blower compartment
hole, drill a hole for your sampling tube into the
heat exchanger.
5. Insert sampling tube through the drilled hole.
6. After a complete check and adjustment of
furnace performance, fill the drilled hole with
a screw that is larger than the hole.
7. Put silicon sealant (rated at least 500° F)
around the screw.
8. Plug the outside hole with the plastic cap you
removed in step 3.
!
WARNING:
If you do not follow these instructions
exactly, a fire or explosion may result
causing personal injury, loss of life, or
property damage.
16. LIGHTING AND SHUTDOWN
GENERAL-ALL MODELS
Read the safety information on the front page of
these installation instructions before lighting
furnace. DO NOT ATTEMPT TO LIGHT
FURNACE IF YOU SMELL GAS.
SAFETY INFORMATION
FOR YOUR SAFETY READ BEFORE LIGHT-
ING.
a. The first lighting of the furnace after any
home setup must be performed by a
qualified service technician.
b. If this appliance has a pilot that must be lit by
hand, follow these instructions exactly.
c. BEFORE LIGHTING smell all around the
furnace for gas. Be sure to smell next to the
floor because some gas is heavier than air
and will settle on the floor.
d. WHAT TO DO IF YOU SMELL GAS: Do not
try to light any appliance. Do not touch any
electric switch and do not use any phone in
your building. Immediately call your gas
supplier from a neighbor’s phone. Follow the
gas supplier’s instructions. If you cannot
reach your gas supplier, call the fire depart-
ment.
e. Use only your hand to push in the gas control
lever. Never use tools. If the lever will not
push in by hand, don’t try to repair it. Call a
qualified service technician. Force or at-
tempted repair may result in a fire or explo-
sion.
f. Do not use this furnace if any part has been
under water. Immediately call a qualified
service technician to inspect the furnace and
to replace any part of the gas valve or control
system which has been under water.
LIGHTING INSTRUCTIONS FOR STAND-
ING PILOT MODELS.
a. Stop! Read the safety information.
b. Set the thermostat to the lowest setting.
c. Turn off all electric power to the appliance.
d. Push in the gas control lever slightly and
move left to “OFF.” DO NOT FORCE.
e. Wait ten (10) minutes to clear out any gas.
If you then smell gas, STOP! Follow step “d”
in the SAFETY INFORMATION. If you don’t
smell gas, go to the next step.
f. Find pilot - follow metal tube (pilot tube) from
gas control valve. Open hinged fire obser-
vation door. The pilot is found at the end of
the pilot tube just left of the pilot shield.
g. Slightly depress the gas control lever and
move it right to the “ON” position and release;
then move it to the “PILOT” position.
h. Move the control lever to “SET” and hold.
Immediately light the pilot with a match.
Continue to hold the control lever for about
one (1) minute after the pilot is lit. Release the
lever and it will spring back to the “PILOT”
position. Pilot should remain lit. If it goes out,
repeat steps “d” through “h” above. If the
lever does not spring back when released,
stop and immediately call your service tech-
nician or gas supplier. If the pilot will not stay
lit after several tries, move the gas control
lever to “OFF” and call your service techni-
cian or gas supplier.
i. Move the gas control lever left to “ON”.
j. Turn on all electric power to the furnace. Set
the thermostat to “Heat” and/or the desired
temperature setting. Set the On-Off-Fan
switch to “ON”.
k. Replace the furnace door.


