


ENGLISH / B-9
FORM NO. - 56041684 - BA 755, BA 855 - B-9
BATTERIES
If your machine shipped with batteries installed do the following:
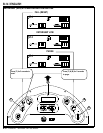
Check that the batteries are connected to the machine (14 or 18).
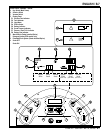
Turn ON the Key Switch (A) and check the Battery Indicator (D or J1). If the gauge is completely fi lled or the green light is ON, the batteries are ready for
use. If the gauge is less than full or the green light is OFF, the batteries should be charged before use. See the “Charging The Batteries” section.
IMPORTANT!: IF YOUR MACHINE HAS AN ONBOARD BATTERY CHARGER REFER TO THE OEM PRODUCT MANUAL FOR INSTRUCTIONS
REGARDING SETTING THE CHARGER FOR BATTERY TYPE.
See TSBUS2007-979 for the latest battery charger algorithms.
If your machine shipped without batteries installed do the following:
Consult your Authorized Nilfi sk dealer for recommended batteries.
Install the batteries by following the instructions below.
DO NOT install three 12 volt batteries in your machine. This affects the stability of the machine.
IMPORTANT!: IF YOUR MACHINE HAS AN ONBOARD BATTERY CHARGER REFER TO THE OEM PRODUCT MANUAL FOR INSTRUCTIONS
REGARDING SETTING THE CHARGER FOR BATTERY TYPE.
See TSBUS2007-979 for the latest battery charger algorithms.
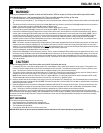
WARNING!
Use extreme caution when working with batteries. Sulfuric acid in batteries can cause severe injury if allowed to contact the skin
or eyes. Explosive hydrogen gas is vented from the batteries through openings in the battery caps. This gas can be ignited by
any electrical arc, spark or fl ame. Do not install any lead-acid battery in a sealed container or enclosure. Hydrogen gas from
overcharging must be allowed to escape.
When Servicing Batteries...
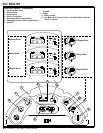
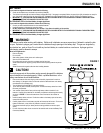
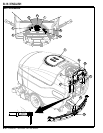
FIGURE 1
* Remove all jewelry
* Do not smoke
* Wear safety glasses, rubber gloves and a rubber apron
* Work in a well-ventilated area
* Do not allow tools to touch more than one battery terminal at a time
* ALWAYS disconnect the negative (ground) cable fi rst when replacing batteries to prevent
sparks.
* ALWAYS connect the negative cable last when installing batteries.
CAUTION!
Electrical components in this machine can be severely damaged if the batteries
are not installed and connected properly. Nilfi sk, a qualifi ed electrician, or the
battery manufacturer should install batteries.
1 Remove the batteries from their shipping crate and carefully inspect them for cracks or
other damage. If damage is evident, contact the carrier that delivered them or the battery
manufacturer to fi le a damage claim.
2 Turn the Master Key Switch (A) OFF and remove the key.
3 Tip the recovery tank to the side, locked position. Remove the battery cables from inside
the battery compartment.
4 Your machine comes from the factory with enough battery cables to install six 6 volt
batteries. Carefully lift the batteries into the battery compartment and arrange them exactly
as shown in FIGURE 1. Secure the batteries as close to the back of the machine as
possible.
5 Install the battery cables as shown. Position the cables so the battery caps can be easily
removed for battery service.
6 Carefully tighten the nut in each battery terminal until the terminal will not turn. Do not over-
tighten the terminals, or they will be very diffi cult to remove for future service.
7 Coat the terminals with spray-on battery terminal coating (available at most auto parts
stores).
8 Put one of the black rubber boots over each of the terminals and connect the Battery Pack
Connector (14 or 18).