


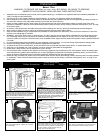


Loosen the 2 set screws in the yoke. Insert
downrod into yoke, aligning large hole in the
downrod with the large hole in the yoke. Insert
cross pin though yoke and downrod.
Insert cotter pin in to cross pin to secure.
Thread leadwire and safety cable through
downrod and half ball.
10
16
11
12
F
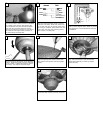
or Canadian installation and for USA fan and
light kit combinations over 35 lbs, in both flush
and downrod mode the safety cable must be
installed into the house structure beams using
the 3” lag screws provided. Make sure that
when the safet
y cable is fully extended the
leadwires are longer than the cable and no
stress is placed on the leadwires.
18
Safet
y cable installation
Safety Cable
Lag Screw
Hang assembled fan from the mounting bracket
installed to ceiling in previous step
. Mak
e sure
the fan is hanging straight. Rotate fan until the
tab on the Mounting br
acket engages the slot
on the Downrod Ball. This must be done to
prevent the fan body from rotating when the
blades are in motion.
R
e-install safet
y bar remo
ved in step. 3 by
placing safety bar on screws, sliding into place,
and tightening the 2 screws.
17
14
Thread wires and safety cable through upper
body and install over downrod to fan body. Next
thread wires and safety cable through canopy
and place over downrod.
L
oosen two set screws holding half ball, slide
down ball and remove pin. Remove the ball.
9
Set screws
Thread wires through half ball, put ball back over
downrod and replace pin then tighten the two set
screws.
15
Set screws
L
ift mounting neck to mounting Plate and align
s
crews.
7
S
ecure mounting neck to the mounting plate
with four screws to become a complete mount-
i
ng bracket.
8
Tighten yoke set screws securely and evenly.
13