


INS1201 - 4/06
Consumer Information Información al consumidor Renseignements pour
les consommateurs
Faucets made of leaded brass alloys may
contribute small amounts of lead to water
that is allowed to stand in contact with the
brass. The amount of lead contributed by any
faucet is highest when the faucet is new. The
following steps may reduce potential exposure
to lead from faucets and other parts of the
plumbing system:
•
Always run the water for a few seconds
prior to use for drinking or cooking.
•
Use only cold water for drinking or cooking.
•
If you are concerned about lead in your water,
have your water tested by a certified laboratory
in your area.
Las llaves mezcladoras fabricadas con
aleaciones de cobre con plomo pueden arrojar
pequeñas cantidades de plomo al agua que
queda en contacto con el bronce, las cuales
son mayores cuando la llave está nueva. Los
siguientes pasos le ayudarán a reducir la
posible exposición al plomo originada por las
llaves y otras piezas del sistema de plomería.
•
Deje correr el agua durante unos segundos
antes de usarla para beber o cocinar.
•
Utilice sólo agua fría para beber o cocinar.
•
Si está preocupado por la cantidad de plomo
que pudiera haber en el agua, llévela a
examinar a algún laboratorio local certificado.
Les robinets fabriqués à partir d’alliages de
laiton et de plomb pourraient ajouter de petites
quantités de plomb à l’eau si celle-ci était
stagnante et qu’elle touchait au laiton. La
quantité de plomb ajoutée par tout robinet est
plus élevée lorsque le robinet est nouveau. Les
directives suivantes peuvent aider à réduire
l’exposition au plomb provenant du robinet et
d’autres parties de la tuyauterie :
•
Toujours faire couler l’eau pendant
quelques secondes avant de s’en servir
pour boire ou cuire.
•
Utiliser uniquement de l’eau
froide pour boire ou cuire.
•
Si la quantité de plomb dans votre eau
vous inquiète, la faire tester par un
laboratoire local certifié.
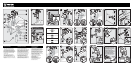
I
93959
127683
127685
127686
100110
104235
104234
127684
H
J
K
L
M
N
9501
O
F
G
A
B
C
D
E
x3
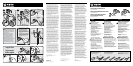
1
F
G
<1/2" (<1.27cm)
2
F
H
Thin deck /
Cubierta fina /
T
Plateforme mince
J
H
I
I
A
B6
B
B
A
A
2
I
J
Thick deck /
Cubierta gruesa / Plateforme èpaisse
>1/2" (>1.27cm)
H
F
Discard
Descarte
Jeter
F
D
J
3"
3
I
4
G
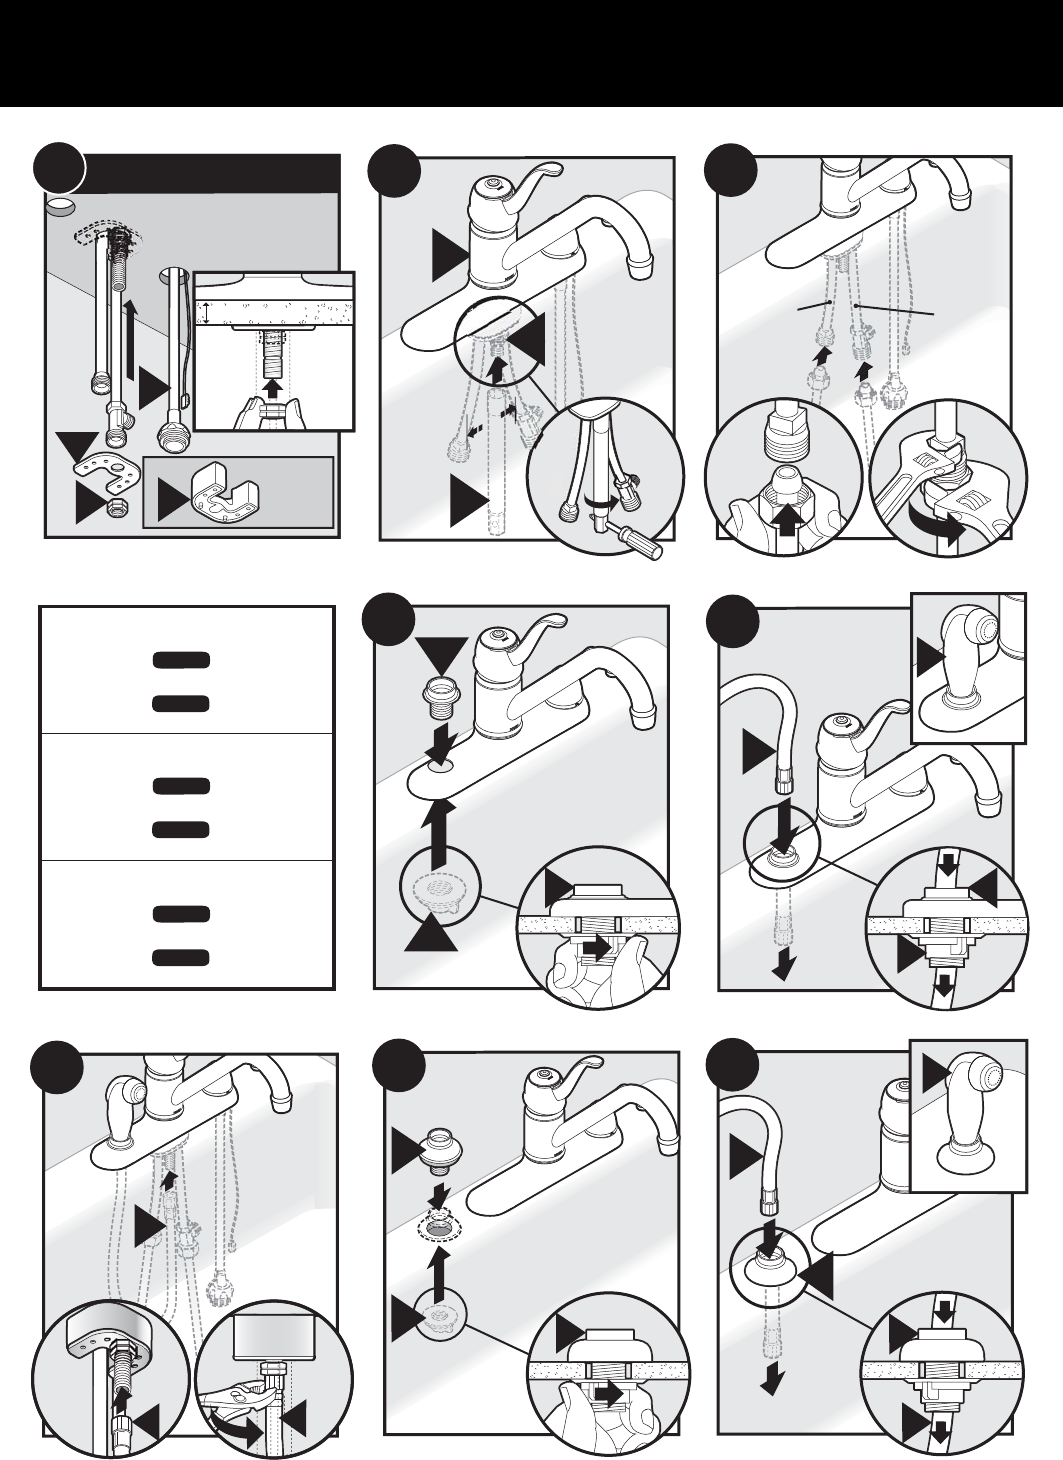
1
2
Hot
Caliente
Chaud
Cold
Frio
Froid
B
A5
2
C
B
3
1
If deck spray, go to step
If escutcheon spray, go to step
A5- A7
B5- B7
A5- A7
B5- B7
A5- A7
B5- B7
Si tiene un rociador de plataforma, vaya al paso
Si rince-légumes sur rosace, aller à l'étape
Si rince-légumes sur plate-forme, aller à l'étape
Si tiene un rociador estilo escudo, vaya al paso
A
A6
B
C
A
B5
B
3
B
C
2
1
A
A7
2
A
1
A
12”min.
4”min.
8”min.
8
L
A
B7
2
A
1
A
L
1/8”
(3.2mm)
9
11
F
11
2
F
NO PIPE DOPE
SIN LUBRICANTE PARA TUBERÍAS
AUCUNE PÂTE LUBRIfiANTE
10
L
E
1
Careful !
Attentif !
Cuidadio !
10B
1
2
120˚
120˚
12
Option/Opción/Option
K
F
L
14
AFTER BATTERY IS INSTALLED, THIS LIGHT WILL BLINK
RAPIDLY FOR 20 SECONDS TO SHOW THAT BATTERY
WAS PROPERLY INSTALLED. IF IT DOES NOT FLASH,
REMOVE BATTERY AND REINSTALL AS SHOWN IN STEP 13.
DESPUES DE QUE SE INSTALA LA BATERIA,
ESTA LUZ TITILARA RAPIDAMENTE POR 20 SEGUNDOS
PARA MOSTRAR QUE LA BATERIA SE INSTALO
CORRECTAMETNE SI NO TITILA, SAQUE LA BATERIA Y
VUELVA A INSTALARLA COMO SE MUESTRA EN EL PASO 13.
APRES L'INSTALLATION DE LA PILE, CE VOYANT
LUMINEUX CLIGNOTERA RAPIDEMENT PENDANT
20 SECONDES POUR INDIQUER QUE LA PILE A ETE
CORRECTEMENT INSTALLEE. SINON, ENLEVER LA PILE
ET LA REINSTALLER COMME INDIQUE A L'ETAPE 13.
3
2
1
L
N
M
13
1
15
2
O