


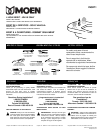
INS271
Faucets made of leaded brass alloys may contribute small amounts of lead to water that is
allowed to stand in contact with the brass. The amount of lead contributed by any faucet is
highest when the faucet is new.The following steps may reduce potential exposure to lead
from faucets and other parts of the plumbing system:
• Always run the water for a few seconds prior to use for drinking or cooking
• Use only cold water for drinking or cooking
• If you wish to flush the entire plumbing system of water that has been standing in the
pipes or other fittings, run the cold water until the temperature of the water drops,
indicating water coming from the outside main
• If you are concerned about lead in your water, have your water tested by a certified
laboratory in your area
Moen products have been manufactured under the highest standards of quality and workmanship. Moen
warrants to the original consumer purchaser for as long as the original consumer purchaser owns their home
(the “Warranty Period” for homeowners), that this faucet will be leak and drip-free during normal use and all
parts and finishes of this faucet will be free from defects in material and manufacturing workmanship. All other
purchasers (including purchasers for industrial, commercial and business use) are warranted for a period of 5
years from the original date of purchase (the “Warranty Period” for non-homeowners).
If this faucet should ever develop a leak or drip during the Warranty Period, Moen will FREE OF CHARGE
provide the parts necessary to put the faucet back in good working condition and will replace FREE OF
CHARGE, any part or finish that proves defective in material and manufacturing workmanship, under normal
installation, use and service. Replacement parts may be obtained by calling
1-800-289-6636 (Canada 1-800-465-6130), or by writing to the address shown. Proof of purchase (original
sales receipt) from the original consumer purchaser must accompany all warranty claims. Defects or damage
caused by the use of other than genuine Moen parts are not covered by this warranty. This warranty is
applicable only to faucets purchased after December 1995 and shall be ef fective from the date of purchase
as shown on purchaser’s receipt.
This warranty is extensive in that it covers replacement of all defective parts and finishes. However,
damage due to installation error, product abuse, product misuse, or use of cleaners containing abrasives,
alcohol or other organic solvents, whether performed by a contractor, service company, or yourself, are
excluded from this warranty. Moen will not be responsible for labor charges and/or damage incurred in
installation, repair or replacement, nor for any indirect, incidental or consequential damages, losses, injury or
costs of any nature relating to this faucet. Except as provided by law, this warranty is in lieu of and excludes
all other warranties, conditions and guarantees, whether expressed or implied, statutory or otherwise,
including without restriction those of merchantability or of fitness for use.
Some states, provinces and nations do not allow the exclusion or limitation of incidental or consequential
damages, so the above limitations or exclusions may not apply to you. This warranty gives you specific legal
rights and you may also have other rights which vary from state to state, province to province, nation to nation.
Moen will advise you of the procedure to follow in making warranty claims. Simply write to Moen Incorporated
using the address below. Explain the defect and include proof of purchase and your name, address, area code
and telephone number.
WARRANTY CONSUMER INFORMATION
INSTALLATION INSTRUCTIONS
3
HELPLINE:
1 (800) BUY-MOEN
[289-6636]
In the U.S.call our toll free Helpline number, for answers to
any product installation, or warranty questions.
In Canada:
Toronto: 905-829-3400;
Rest of Canada: 1-800-465-6130
In Mexico:
(84) 88-08-26, 88-08-27,
o 91-800-84-345
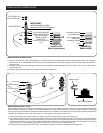
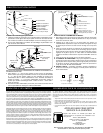
CONNECTING SUPPLY VALVES TO DIVERTER VALVE AND WATER
SUPPLIES:
1. Slide "TEE" onto inlet tube and tighten compression nut. NOTE: Check to
insure ferrule and nut are in place before installing tee onto inlet tube.
Thread one end of each supply hose onto a supply valve, the other end is
threaded to the "TEE" connection inlet. Supply hoses can be crossed or
looped for ease of assembly. NOTE: Remove "COLD SIDE" tape before
making connection.
2. Connect supply tubes (not supplied) to inlet ports. Finish tightening supply
valve mounting hardware.
Hot Side
Cold Side
Supply Tube
Supply Tube
"Tee" Connection
Supply Hose
Supply Stop
(not supplied)
Inlet Tube
(not supplied)
C
O
L
D
S
I
D
E
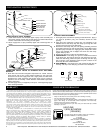
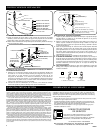
DISCHARGE TUBE
SPRAY NOZZLE
RUBBER WASHER
RUBBER WASHER
METAL WASHER
MOUNTING NUT
3/8" x 3/8" x 22"
SUPPLY TUBE
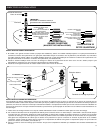
Drain hole
Pop-up drain plug
Drain body
1-1/4" (32mm) Tailpipe
Slip joint nut (not included)
Slip joint washer (not included)
Floor drain (not included)
Seat
Bottom gasket
Included in bidet trim kit
TO INSTALL WASTE ASSEMBLY:
1. Thoroughly clean around drain opening on bidet drain hole. Apply a
1/4" bead of plumber's putty (not furnished) around the drain
opening.
2. Apply pipe joint compound or Teflon tape (not furnished) to top
threaded end of drain body. Slip drain body up through the drain
opening and screw seat on the drain body.
3. Position the drain body with pivot rod opening extending rearward
and tighten mounting nut until the drain body is snug. Wipe excess
plumber's putty from seat area. Apply pipe joint compound or Teflon
tape to top threaded end of tailpipe and screw into drain body.
Tighten firmly by hand.
4. Position the drain plug in either of the following ways:
A. VANDALPROOF - This design is to prevent unauthorized removal
of the drain plug. Unscrew the pivot nut and remove the pivot rod.
Inside the drain body, position the pivot rod through the drain plug
hole as shown in the illustration. Screw the pivot nut back on the
drain body. DO NOT OVERTIGHTEN.
B. EASY REMOVAL -This design is for quick removal of drain plug for
cleaning. Just drop in the drain plug as shown in the illustration.
Pivot RodPivot Rod
VANDAL PROOF EASY REMOVAL
A B
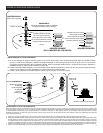
INSTALLATION OF SPRAY ASSEMBLY
1. Install rubber washer over threaded nipple of spray nozzle assembly and
place down through smaller hole in bidet bowl. From below install metal
washer, metal washer and mounting nut and tighten.
2. Attach supply tube to spray assembly nipple and to discharge tube as
shown.
Moen Incorporated • 25300 Al Moen Drive • North Olmsted, OH 44070-8022 U.S.A. In Canada Moen Inc.• 2816 Bristol Circle • Oakville,Ontario L6H5s7