


25300 Al Moen Dr., North Olmsted, OH 44070-8022 U..S.A.
HELPLINE: Call our toll free Helpline number,
for answers to any product, installation, replacement
parts, or warranty questions.
MT620J AUG '96
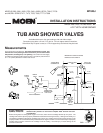
To Eliminate Cross-Piping On Back-To-Back Installations or To Correct
Reversed Rough-In Where Hot and Cold Positions Are Reversed:
Remove handle knob or handle lever, handle parts and stop tube (see "Disassembly"). Turn valve stem around so that the notched flat is turned one half
turn or 180 degrees. Re-install handle parts and handle knob or lever. Tighten handle screw securely; replace handle cover (on knob handles).
Cleaning & Care Instructions
for Special Finish Models:
All that is necessary to clean these faucets is to wipe them with a soft, damp cloth such as terrycloth. Warm water will remove dry
water spots.
CAUTION: DO NOT use cleansers which contain abrasives or harsh chemicals. NEVER use alcohol or other organic solvents. A high
quality, non-abrasive wax polish applied occasionally, will help to preserve the deep tones of the finish.
(Continued from page 3)
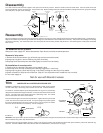
E
SCUTCHEON: Remove screw holding plaster ground in place. Discard plaster ground. Temporarily install handle knob or lever. Turn on water and check
system for leaks. If there are no leaks, turn OFF water and remove handle knob or lever. Install escutcheon plate with two screws provided Mount with the
notch UP. Install stop tube. The notched flat on the cartridge stem must point UP when mounting the handle knob or lever. Mount handle knob or lever on
the stem and replace handle screw tightly. Snap handle cover in place on the handle.
IMPORTANT FINAL CHECK: If above instructions have been followed correctly there will be clearance between the handle and the escutcheon when the
handle is pushed into the closed position, otherwise the valve will not shut off.
®
© Moen Incorporated 1996
Printed in U.S.A
(800) BUY - MOEN
(289-6636)