


OC194-48
BRANCH DUCT (installation at site)
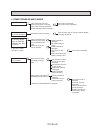
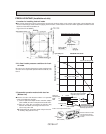
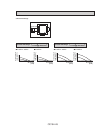
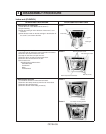
1. Branch Duct Installation Procedure 2. Branch Duct Installation
To discharge air from a branch duct, install it during the initial installation.
Install branch duct at site by following procedure
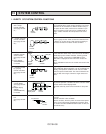
(1) Remove insulation along the broken-lines on unit
surface at the back-side of the indoor unit. Knock
out the branch duct connecting point.
(2) Secure flange, procured locally, by twelve ST
screws (4.0 dia).
(3) Connect flange to duct.
(4) Tear off the insulation material on the surface of the
main body of the unit, push in the insulation and
secure it air tightly.
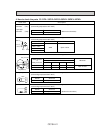
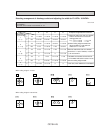
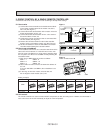
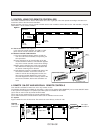
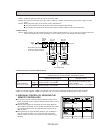
3. Air flow & Static Pressure Characteristics of Branch Duct
■ The air flow and static pressure characteristics of the branch duct when installing a standard panel (4 direction discharge
or when applying a 2-direction discharge is as follows.
Opening measurements for PL30/36/42FK air within ( ).
Standard: 4 direction discharge 2 direction discharge
4 direction discharge (11-13/16
OO
4 directions). 2 direction discharge (17-11/16
OO
2 directions).
Branch duct
3-15/16
11-13/16
(11-13/16)
Branch duct
3-15/16
17-11/16
11-13/16
(27-9/16)
11-13/16
(25-9/16)
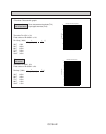
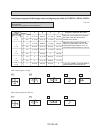
Static pressure
[in.W.GO10
–2
]
12
Hi
Lo
Hi
Lo
8
4
0 50 100 150
11-13/16O4 directions
Air capacity
[CFM]
Static pressure
[in.W.GO10
–2
]
12
8
4
0 50 100 150
11-13/16O4 directions
Air capacity
[CFM]
Hi
Lo
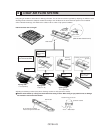
Static pressure
[in.W.GO10
–2
]
12
8
4
0 50 100 150
16
17-11/16O2 directions
Air capacity
[CFM]
Hi
Lo
Static pressure
[in.W.GO10
–2
]
12
8
4
0 50 100 150 200
16
17-11/16O2 directions
Air capacity
[CFM]
●PL18FK21 ●PL24FK21 ●PL24FK21●PL18FK21