


10
11
INTRODUCTION
To get the best out of your new appliance, please read this user guide carefully
beforeusingitforthersttime.Takeparticularnoteofthesafetyprecautions.We
also recommend that you keep the instructions for future reference, so that you can
remind yourself of the functions of your appliance.
SAFETY MEASURES
General
• Incorrectuseofthisappliancemaycausepersonalinjuryanddamage.
• Useforitsintendedpurposeonly.Themanufacturerisnotresponsibleforany
injuryordamageresultingfromincorrectuseorhandling(seealsoGuarantee
Terms).
• Fordomesticuseonly.Notforoutdoororcommercialuse.
• Forconnectionto230V,50Hzonly.
• Donotimmersetheappliance,cordorpluginwateroranyotherliquidand
make sure no water enters the appliance.
• Nevertouchtheappliance,cordorplugwithwetordamphands.
• Donotexposetodirectsunlight,hightemperatures,humidity,dustorcorrosive
substances.
• Neverleavetheapplianceunattendedwhenitisswitchedon.
• Keeptheapplianceunderconstantsupervisionwhileinuse.Keepaneyeon
children.
• Donotusetheapplianceunlessttedwithexhaustlter,motorlteranddust
bag, as this could damage the appliance.
• Onlyuseaccessoriesmanufacturedorrecommendedbythemanufacturer.
Use
• Donotuseitonwetsurfaces.
• Takeparticularcarewhenvacuumingstairs,duetotheriskoffalling.
• Donotusethekittovacuumupmatches,hotashes,cigarettebutts,hardor
sharpobjects,wetordampsubstances,combustiblematerials(petrol,solvents,
etc.) or vapour from these.
• Donotusetovacuumnesandordust–e.g.plaster,brickdustandthelike.
• Ensurethatyoukeepclothing,hairandbodypartsawayfromthenozzleand
moving parts of the appliance.
• Neverinsertanythingintotheopeningsoftheappliance.
• Donotcovertheappliance’ssuctionorexhaustport.
Cord and plug
• Keepthecordandapplianceawayfromheatsources,hotobjectsandnaked
ames.
• Takecaretopreventbendingandkinkingofthecordandavoidpullingthecord
aroundsharpcornersorjammingitindoors,etc.
• Switchtheapplianceoffandunplugitwhenitisnotinuse,andbeforeyou
replacethedustbagandcleanorreplacethelters.
oAvoidpullingthecordwhenremovingtheplugfromthesocket.Instead,hold
the plug.
oKeepholdoftheplugwhenrewindingthecord,sothatitdoesnotstrikethe
applianceoranyotherobjectsinthevicinity.
• Checkregularlythatneithercordnorplugisdamagedanddonotuseiftheyare,
or if the appliance has been dropped or damaged in any other way.
• Iftheappliance,cordorplughasbeendamaged,havetheminspectedandif
necessaryrepairedbyanauthorisedrepairer.Nevertrytorepairtheappliance
yourself. Please contact the store where you bought the appliance for repairs
undertheguarantee.Unauthorisedrepairsormodicationstotheappliancewill
invalidate the guarantee.
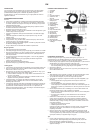
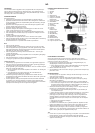
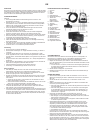
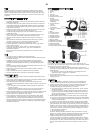
KEY TO MAIN COMPONENTS OF THE APPLIANCE
1. Airvalve
2. Handle
3. Hose
4. Lid
5. Hoseconnectorport
6. Bagchangeindicator
7. Buttonforautomatic
cord rewind
8. Cordandplug
9. Carryinghandle
10.Nozzleholder
11. Exhaust
12. On/Off button
13.2-piecepipe
14.Brushfunctionbutton
15.Floornozzle
16. Lock buttons
17.Hoseconnector
18.Exhaustltersponge
19.Exhaustltergrille
20.Motorltersponge
21.Motorlterholder
22.Crevicenozzlewithbristle
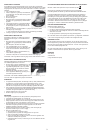
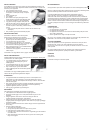
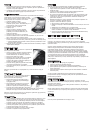
PREPARING THE APPLIANCE
IMPORTANT!Beforeusingtheapplianceforthersttime,openthelid(4)andcheck
thatthemotorlter(20-21),exhaustlter(18-19)anddustbagaretted(seethe
sectionsonreplacementofltersanddustbagbelow).
• Attachthehose(3)totheappliancebyinsertingthehoseconnector(17)inthe
holeonthehoseconnectorport(5)onthetopoftheappliance,untilyouheara
click.
o To remove the hose, press the lock buttons (16) on both sides of the hose
connector and pull the hose out of the appliance.
• Assemblethetwopiecesofthepipe(13).
• Attachthehandle(2)tooneendofthepipeandattachtheoornozzle(15)to
the other end of the pipe.
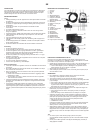
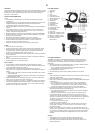
USE
• Pullthecord(8)outoftheappliance.Thecordmustnotbepulledoutany
further than the red mark. Plug in and switch on the power.
• PresstheOn/Offbutton(12)tostartandstoptheappliance.
• Whileinuse,thesuctionforcecanberegulatedbyopeningandclosingtheair
valve (1) on the handle.
o When the valve is closed, full suction is achieved. This is the normal setting.
o When the vent opens, more air is allowed in, reducing the suction power at
theoornozzle.Thisfunctionisidealforcleaningcurtainsandotherlight
items which can get sucked into the nozzle.
• Theoornozzlebristleshavetwosettingswhichcanbeselectedusingthe
brush function button (14) on top of the nozzle.
oWhencleaninghardsurfaces(stoneooring,tiles,etc.),thenozzlebrushes
should be extended.
o When cleaning carpets and rugs, the brushes should be retracted into the
nozzle.
• Thebagchangeindicator(6)willnormallybedarkblue.Ifitchangestoorange
whenthevacuumcleanerisinuse,orifthesuctionstrengthissignicantly
reduced, the dust bag must be replaced (refer to Replacing dust bag below). If
the indicator remains orange after the bag has been replaced, it may be due to
one of the following reasons:
o The hose or nozzle is clogged.
oTheexhaustlterisdirty.
Investigate what is causing the indicator to remain orange and deal with the
problem. The appliance must not be used if the indicator is orange. This may
cause irreparable damage to the motor.
• NOTE!Theapplianceswitchesoffautomaticallyifthemotoroverheats.Switch
off the appliance on the On/Off button, disconnect the plug from the mains
socketandallowtheappliancetocooloffforapprox.1hour.Cleanthelters
andreplacethedustbag(seethesectionsonreplacementofltersanddust
bag below), before using the appliance again.
Tips
• Ifyouneedtotakeabreakfromvacuumcleaning,placethenozzleinthenozzle
holderatthebackoftheappliance(10)orintheequivalentbracketonthe
bottom of the appliance.
• Youcanliftandcarrytheapplianceusingthecarryinghandle(9).Neverpullor
lift the appliance by the cord.
UK